Scott Foil - Westbrook Cycles
Comments
-
Well it's obviously assembled wrong. I'd disassemble it and make sure you have everything in the right order and the right way up. After that, it's ensuring that you have applied enough pressure and the plug isn't slipping out.ROAD < Scott Foil HMX Di2, Volagi Liscio Di2, Jamis Renegade Elite Di2, Cube Reaction Race > ROUGH0
-
Fixed it now, had the wrong spacer above the stem (long day) put the one that's a few mm bigger and jobs a goodn!0
-
I've just received my Foil Team issue from Westbrook. Everything has gone well with the build except for the brakes. The front seems so spongy. Due to the size of the barrel adjusters on both calipers the ferrels supplied don't fit. Do I need to fit some others or is the cable sitting in the adjuster sufficient.
Also I am getting some rubbing from where the rear cable passes past the steerer tube within the frame. I have tried different routes of the cable to the opening in the frame but to no avail. Any suggestions would be most welcome. Thanks.0 -
Yeah, I got that as well. I found it was better with the rear cable housing loop "inside" the front brake housing, i.e. with the front housing touching and sort of pushing the rear loop towards the head tube (rather than the rear cable housing looping wider than the front housing).wafuwall wrote:Also I am getting some rubbing from where the rear cable passes past the steerer tube within the frame. I have tried different routes of the cable to the opening in the frame but to no avail. Any suggestions would be most welcome. Thanks.
It might be something to do with UK brake routing, with the rear operated by the left lever rather than the other way around. I worried a little that the brake cable might eventually saw a slot in the steerer tube and compromise its structural integrity, but I don't notice the problem any more and the steerer hasn't snapped yet...") 0
0 -
Two things that may help:
- front derailleur: the carbon "wedge" that's supplied is not symmetrical - one side is wider than the other. If you can't get your derailleur parallel, it might be worth turning this around. For what it's worth, I put the wider side on the outside, which pushes the derailleur in, and then push it back out with the adjustment screw. Couldn't get it to work the other way around.
- head tube plug: this is not great. Mine has worked loose once by a couple of mm, despite being torqued to the recommended setting. I reassembled using some paste inside and so far so good. If it works loose again I'll be looking for a deda plug which is longer than the one supplied - http://www.wiggle.co.uk/deda-expander-bung/
I've put a quick page up on what's needed and how to build, with pictures to be added. http://www.atgani.com
(All the gear and no idea - seems to sum me up well ) Synapse Alloy 105 / Rock Lobster Tig Team Sl0
 -
No Di2 on the 2015 Foils!?
I've got a newly assembled 2012 Foil 15 in 54cm which has only been ridden for the Retul fit, it's too small for me so I need a 56cm. If anyone wants to swap or knows of a 56cm frameset going anywhere please holla. Thanks!0 -
Where have you heard that there won't be any Di2 Foils for 2015? They have Di2 on the rest of their range so that doesn't make any sense to me.
edit- As I suspected Di2 is available on 2015 models. http://www.roadbikeaction.com/Features/content/313/8364/Being-There-Scott-Week-Press-Camp.htmlEnglish Cycles V3 | Cervelo P5 | Cervelo T4 | Trek Domane Koppenberg0 -
I have my foil team issue with internal di2 battery.
Is the frame set the same as mine has external holes for a battery.
Also, how did you secure the battery inside the seat post?
MattScott Foil Di2 viewtopic.php?f=40044&t=13020685&p=19496365#p19496365
Genesis Volare 853 viewtopic.php?f=40044&t=13020702&p=19589281#p195892810 -
matt-h wrote:I have my foil team issue with internal di2 battery.
Is the frame set the same as mine has external holes for a battery.
Also, how did you secure the battery inside the seat post?
Matt
If you have the internal battery, the bundle should have come with the plastic seat post shim/ bung for the battery.0 -
Mine didn't come with a shim/bung. My LBS put it all together for me and ended up wrapping it bubble wrap or something similar if memory serves. Seems fine so far.0
-
Yep, bubble wrap seems to be a fairly common and effective method.0
-
rajawelsh wrote:No Di2 on the 2015 Foils!?
I've got a newly assembled 2012 Foil 15 in 54cm which has only been ridden for the Retul fit, it's too small for me so I need a 56cm. If anyone wants to swap or knows of a 56cm frameset going anywhere please holla. Thanks!
Did you resolve your problem, I'm in the market for a 54cm road bike?time to man up.0 -
stuyd wrote:rajawelsh wrote:No Di2 on the 2015 Foils!?
I've got a newly assembled 2012 Foil 15 in 54cm which has only been ridden for the Retul fit, it's too small for me so I need a 56cm. If anyone wants to swap or knows of a 56cm frameset going anywhere please holla. Thanks!
Did you resolve your problem, I'm in the market for a 54cm road bike?
Sure you don't fancy a 52 Venge?0 -
Hi folks,
I've been building up my Foil 6870 Di2 bundle this evening and things are going fine, with the exception of the front derailleur mounting.
I'm using the carbon washer correctly as far as I can tell, but when I come to torqing up the fixing bolt to 4Nm, I can hear the carbon bracket start to make dodgy cracking noises before I reach 4Nm and it looks like part of the surface on the outside of the bracket, near the frame has indeed delaminated!
Am I just being a pussy and should I just carry on tightening to 4Nm? My build has stopped dead because of this. Also, how can I get the cages parallel, as when I tighten the bolt, it becomes misaligned.
Here's a couple of pics: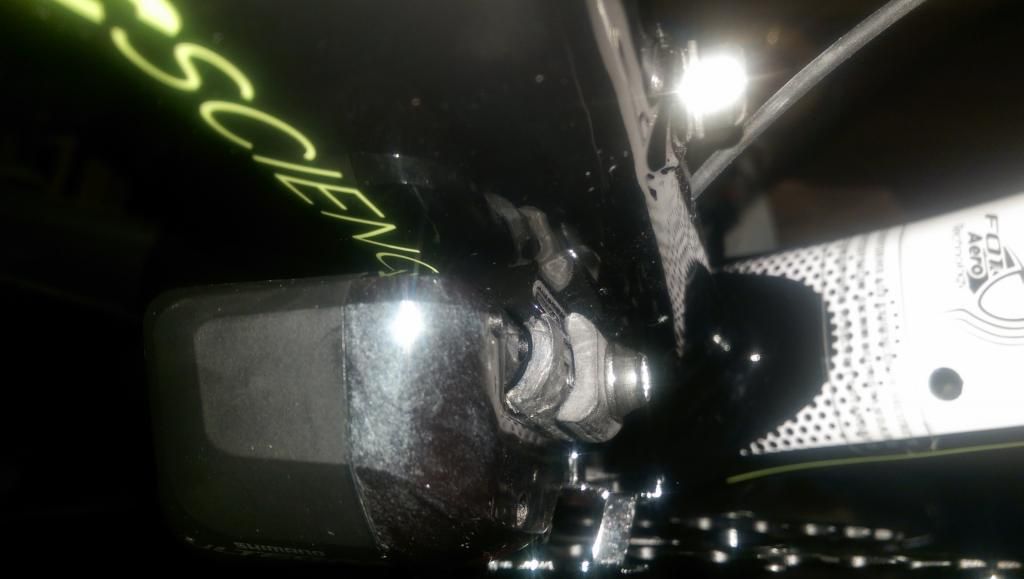
 0
0 -
I tightened mine to 3.5nm and still got some cracking noises.
I also had difficulty in alligning the FD and it took me several attempts where I basically misalligned it slightly so that when the FD reacted to the torque it brought it back inline.
Someone a few posts back mentioned that the washer was thicker on one side. I've not bothered to check as all is well but that may have an impact on allignment.
Let us know how you get on when the build continues.
Life is like riding a bicycle: you don't fall off unless you stop pedaling.
Scott Foil Team Issue HMX Di2
Boardman Team Carbon LTD0 -
Cheers for the reply. I torqued it up a bit more, just short of 4Nm and it seemed ok. As per previous post, I set the carbon wedge to angle the rear of the cage inwards and then used the support screw on the mech (screwing inwards) to angle it back out to parallel. Seems to shift fine.
Last issue I have now, is the Di2 plug on the downtube which doesn't fit, as the collar on the plug has nothing to 'plug' into (the inside of the frame hole is fnished smooth). What have other people done with theirs? I've called Westbrooks and they just said that they just use the supplied plug with no issues. I just thinking of resorting to some electrical tape.0 -
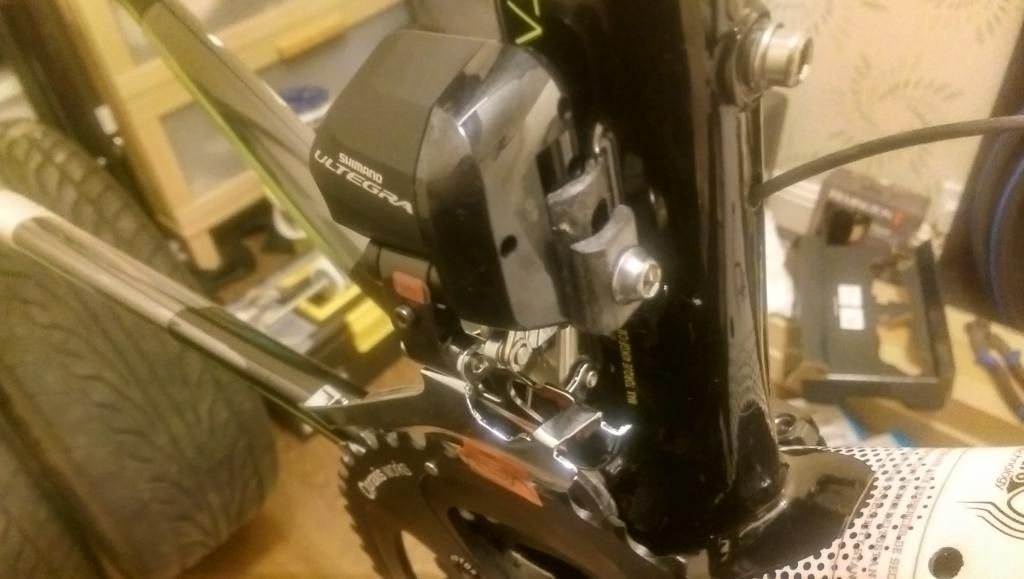
Whats the wire you have coming out of the frame? I didn't use that hole I just blanked it. My cable for the FD come out the hole in the bottom right of your picture.
Life is like riding a bicycle: you don't fall off unless you stop pedaling.
Scott Foil Team Issue HMX Di2
Boardman Team Carbon LTD0 -
DKay wrote:It's the hole for the main cable on the rhs of the downtube. The grommet just won't stay put and keeps popping out.
[img]http://i1284.<span%20class="skimlinks-unlinked">photobucket.com/albums/a570/dennisk8/Scott%20Foil%20Di2%20build/IMAG2773_zps91fd5414.jpg</span>[/img]
Get a Stanley knife and carefully pare-off some of the lip on the grommet whilst making it rounder in the process. That's what I did with mine. IIRC the grommet is oval but the hole is round.0 -
borisface wrote:DKay wrote:It's the hole for the main cable on the rhs of the downtube. The grommet just won't stay put and keeps popping out.
[img]http://i1284.<span%20class="skimlinks-unlinked">photobucket.com/albums/a570/dennisk8/Scott%20Foil%20Di2%20build/IMAG2773_zps91fd5414.jpg</span>[/img]
Get a Stanley knife and carefully pare-off some of the lip on the grommet whilst making it rounder in the process. That's what I did with mine. IIRC the grommet is oval but the hole is round.
Great tip. I've just used some fine-tipped dissection sissors and it's all sorted now.
Thanks for your help.0 -
Had a quick look at my unbuilt frame set last night.
I'm sure this is a stupid question, but can the rear brake outer cable housing be run uninterrupted thru the top tube, or is it supposed to be cut? I know the outer won't fit thru the supplied groms, but I'm sure they could easily be drilled out to allow the outer to pass thru.0 -
Pippi Langsamer wrote:Had a quick look at my unbuilt frame set last night.
I'm sure this is a stupid question, but can the rear brake outer cable housing be run uninterrupted thru the top tube, or is it supposed to be cut? I know the outer won't fit thru the supplied groms, but I'm sure they could easily be drilled out to allow the outer to pass thru.
:shock:
I really wouldn't do this0 -
antsmithmk wrote:Pippi Langsamer wrote:Had a quick look at my unbuilt frame set last night.
I'm sure this is a stupid question, but can the rear brake outer cable housing be run uninterrupted thru the top tube, or is it supposed to be cut? I know the outer won't fit thru the supplied groms, but I'm sure they could easily be drilled out to allow the outer to pass thru.
:shock:
I really wouldn't do this
I'm not talking about drilling the frame
I'm talking about drilling out the cheap ass plastic ferrules/ grommets to make the trailing end hole diameter big enough to allow the cable outer to pass...0 -
Pippi Langsamer wrote:Had a quick look at my unbuilt frame set last night.
I'm sure this is a stupid question, but can the rear brake outer cable housing be run uninterrupted thru the top tube, or is it supposed to be cut? I know the outer won't fit thru the supplied groms, but I'm sure they could easily be drilled out to allow the outer to pass thru.
Ummm...why would you want to do this? :? You'd just be adding extra friction to the operation of the rear brake.
You'll need two runs of cable outer; one from the shifter to the grommet which goes into the front of the top tube and another shorter one from the grommet at the back of the top tube to the rear brake caliper. Only the inner cable is supposed to just run through the top tube. Don't use ferrules on the outers, as they won't fit. Just make sure you make nice clean cuts.0 -
DKay wrote:Pippi Langsamer wrote:Had a quick look at my unbuilt frame set last night.
I'm sure this is a stupid question, but can the rear brake outer cable housing be run uninterrupted thru the top tube, or is it supposed to be cut? I know the outer won't fit thru the supplied groms, but I'm sure they could easily be drilled out to allow the outer to pass thru.
Ummm...why would you want to do this? :? You'd just be adding extra friction to the operation of the rear brake.
Huh? Where's the extra friction in running a brake cable outer all the way from the brake hood directly to the caliper? You'll only get more friction by cutting outers as per the norm and increasing your potential entry points for contaminants.
You'll need two runs of cable outer; one from the shifter to the grommet which goes into the front of the top tube and another shorter one from the grommet at the back of the top tube to the rear brake caliper. Only the inner cable is supposed to just run through the top tube. Don't use ferrules on the outers, as they won't fit. Just make sure you make nice clean cuts.
Yes, I know how brake/ gear cables are generally configured. Got 30 years experience of that
Makes sense to me (as you see in most MTB setups), to try run the cable and outer as-one if possible. Just wondered if anyone had tried this with the foil frame. I'd happily give away a few grams to the extra housing in favour of cleaner braking lines....0 -
DKay wrote:If you have 30 year of experience, then why do you not understand that longer cable outers will increase friction?
Also, if you know it all already and you're just going to throw advice back into somebody's face, then why bother asking for it in the first place? :?
Geez.
I'm not throwing anything back in anyone's face, so if I caused offence then I will apologise.
I just don't agree that longer outers increase friction, given cutting creates two more potential points of stichion/ contamination.
It's all good- thanks for the advice. Happy riding :arrow:0 -
Pippi Langsamer wrote:I'm not throwing anything back in anyone's face, so if I caused offence then I will apologise.
I just don't agree that longer outers increase friction, given cutting creates two more potential points of stichion/ contamination.
It's all good- thanks for the advice. Happy riding :arrow:
On a MTB which is going to be subjected to wet, dusty, gritty and muddy conditions, then you may have a point about increased risk of dirt ingress. But, on a road bike that obviously isn't an issue. Also, as long as you make a clean cut and open up the inner cable lining afterwards, then stiction isn't an issue either.
Everyone knows that you should make cable runs as short as possible to reduce slop and friction to a minimum, without subjecting the run to excessively tight radii.0 -
Probably asking the wrong group of people but have I been stupid for ignoring this deal for the last six months? I'm always on the look out for my next dream bike but have somehow ignored this thinking that aero bikes are just a fad that riders wouldn't use if it wasn't for the UCI weight limit and Di2 is a solution to a problem that isn't really there.
Starting to be drawn in though...
What's the catch? The frame is only 80g or so more than the real light weight models, I haven't seen a bad review and a great bike could be built up for roughly £2.5k. I like the sensible properly lacquered frame and the internal cabling is great for hanging it from hooks in our hall.
Is Di2 really not that much heavier though? I read somewhere it's lighter than a mechanical 6800 groupset but that can't be true if you include the battery and junction boxes can it (shifters and mechs are 9g lighter I think)?
Something just doesn't pull at the heart strings like a crazy light frame with SRAM Red would but am I just being daft as ride in the hardly mountainous Kent? I guess, nobody actually "needs" a high end bike so there has to be that irrational appeal as well.
Just for a bit of context, it would be for summer use on fast club runs (I don't race but also don't do plodding rides).
Anyway, apologies for dumping this diatribe into what looks like a great knowledge sharing thread for everyone doing their own build.0 -
Basically, there isn't a catch.. For whatever reason previous years' models of the Foil can be had very cheaply, although the frames are identical to the current models save for the paint jobs.
If you want a "high-end bike" just because it's nice to have a high-end bike, get the HMX version. You can then relax in the knowledge that you are riding exactly the same frame as the Orica Green Edge and IAM teams are still riding this season ;-) (paint jobs aside).0


![[img]http://i1284.<span%20class="skimlinks-unlinked">photobucket.com/albums/a570/dennisk8/Scott%20Foil%20Di2%20build/IMAG2773_zps91fd5414.jpg</span>[/img]](/home/leaving?allowTrusted=1&target=http%3A%2F%2Fs1284.%3Cspan%2520class%3Dskimlinks-unlinked%3Ephotobucket.com%2Fuser%2Fdennisk8%2Fmedia%2FScott%2520Foil%2520Di2%2520build%2FIMAG2773_zps91fd5414.jpg.html%3C%2Fspan%3E)