The Scott CR1 SL Thread
Comments
-
IS that 53/39 upfront? Pretty aggressive combo with an 11-23 rear cassette...SimonInd wrote:Finally took a picture of mine, I've been riding it for weeks. Now with a Brooks Swift installed it's even more comfortable.
Build details:
Ritchey WCS Headset, Stem, Handlebar and Seatpost
Campagnolo Centaur group except:
Record 11-23 cassette
Ultegra compact chainset
KMC X10 Chain
Campagnolo Zonda Wheels
Brooks Swift Ti saddle
Shimano M540 SPD pedals
Obviously need to chop the steerer a bit more at some point as it looks ugly sticking up.Do not write below this line. Office use only.0 -
He says Ultegra compact...0
-
Oh yes...! Lightweight....keef66 wrote:He says Ultegra compact... Do not write below this line. Office use only.0
 -
So the SL frame was better than the Pro but the pro is still a damn good buy?Chunky Cyclists need your love too! :-)
2009 Specialized Tricross Sport
2011 Trek Madone 4.5
2012 Felt F65X
Proud CX Pervert and quiet roadie. 12 mile commuter0 -
Kieran_Burns wrote:So the SL frame was better than the Pro but the pro is still a damn good buy?
Absolutely!0 -
Yeah. I've been singing the praises of my CR1 Pro for years. Even at full price it's a very good frame.Mud - Genesis Vapour CCX
Race - Fuji Norcom Straight
Sun - Cervelo R3
Winter / Commute - Dolan ADX0 -
Just ordered a Pro in 56 to replace my cracked S30 frame.
Should all be a straight swap over, I hope!0 -
-
Thinking about using lime green bar tape on my build. Will pick up on the green accent, Scott saddle Westbrook gave me when I picked up my frame, just thinking it might make the bike a little different and will look good with the 50mm rims I'm ordering for it. Bit like this although my saddle only as a small splash of green ??
http://www.bikeforums.net/showthread.ph ... -and-tires0 -
I dithered on the SL until my size was OOS. Then I dithered on the Pro half hoping it too would got OOS, but alas this thread finally convinced me. Pro ordered and delivered tomorrow. Now to search for the rest of the parts and start the obligatory threads;
a) my build
b) what wheels for a "larger" rider?")
P.S Don't tell my better half...0 -
For those that have done the build am I correct that the seat bolt torque is a max of 4nm?
thanks0 -
samsbike wrote:For those that have done the build am I correct that the seat bolt torque is a max of 4nm?
thanks
I did mine to 3.5nm with some assembly paste, hasn't budged yet.
De-Stickered fulcrum 3's and planet-X bottle cages. Ultegra 6700, 3T black series finishing kit. Rides very nicely but I may need a shorter stem and will drop one of the spacers from the stack height.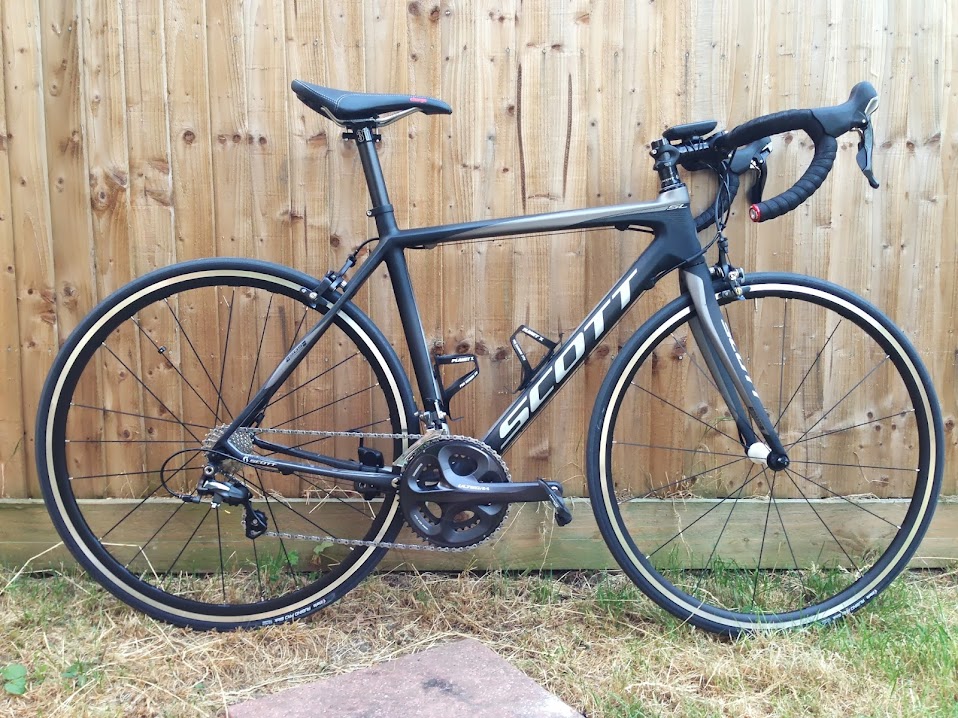
#1 Brompton S2L Raw Lacquer, Leather Mudflaps
#2 Boeris Italia race steel
#3 Scott CR1 SL
#4 Trek 1.1 commuter
#5 Peugeot Grand Tourer (Tandem)0 -
As the CR1s pictures seem to be spread over a gazillion pages I have started a thread in Your Road Bikes so we can all have a look at them in one nice easy place, link below.
viewtopic.php?f=40044&t=12933106&p=18451437#p18451437
Please feel free to post your pics in there too.
Thanks25th August 2013 12hrs 37mins 52.3 seconds 238km 5500mtrs FYRM Never again.0 -
Koncordski wrote:samsbike wrote:...but I may need a shorter stem
I too may need to swap stems and possibly more. I'm actually struggling to get completely comfortable on the bike (not just the Scott's fault) and so I've finally booked myself in for a fit. I'm hoping it'll iron out all of those little niggles that have been bothering me for a while.0 -
I might actually get round to building mine up soon - got a steerer / headset question. Have searched numerous threads on steerer height and most say that you should have the spacers, stem then 2/3mm of steerer tube covered by a 5mm spacer so the top cap screws down solely onto the spacer, pre-loads the bearings then you do the stem bolts up. Firstly do you need that 2/3mm of steerer above the stem or is it OK to have it flush with the top of the stem and thus no spacer above the stem? Secondly I have always been under the impression that the bolt down through the top cap does not - or rather should not - be used to hold everything tight and that it's the tension from the stem bolts that 'hold' the steerer/headset/spacers/stem in place. Is there a definitive right or wrong way to do it? Also how far down the steerer do I need to push the expander bung - does it go to such a depth that puts it in between the stem bolts?
Thanks.0 -
This is covered up thread.
With the Scott, the steerer should be cut ~5mm below the top of the stem. The bung goes in flush with the top of the steerer. The top cap is tightened to adjust the bearing preload, the stem bolts then tightened to take up the strain and the top cap bolt can be backed off a smidge.
There was some debate about the steerer being left proud of the stem but this was advice carried over from other manufacturers instructions/heresay/witchcraft etc. Scott say to cut ~5mm short.
Cue heated debate....0 -
Thanks, I get that there may be varied opinions on this..! However, if I cut the steerer so it's 5mm below the top of the stem then the top stem bolt won't be fully gripping the steerer tube - I'm only a layman, but I'm struggling to see how that's beneficial... :?0
-
Pollys Bott wrote:Thanks, I get that there may be varied opinions on this..! However, if I cut the steerer so it's 5mm below the top of the stem then the top stem bolt won't be fully gripping the steerer tube - I'm only a layman, but I'm struggling to see how that's beneficial... :?
Yeah, you're correct. It won't always be completely gripping the steerer tube. That's one of the reasons I (among others) cut the tube so it's roughly level with the top of the stem, then stack a 5mm spacer on top of the stem and the top cap on top of that as you suggested above; it keeps the pre-load function of the topcap/steerer bung/star nut separate from the "grip the steerer tube" function of the stem bolts.
Yes, you're also correct about the fact you do the top cap bolt up *first*, purely to pre-load the bearings. The correct *maximum* tightness is generally found by picking the bike up by the top tube and confirming that the forks (with front wheel in place) can "easily" fall to one side or the other. If the wheel sticks or turning the forks feels graunchy then it's too tight and you should release the stem bolts, undo the top cap slightly, and re-tighten the stem bolts. The correct *minimum* tightness is found by putting the front brake on and trying to "rock" the handlebars backwards and forwards. If you can see the steerer/stem assembly wobbling it's probably too loose, and you should release the stem bolts, tighten the top cap, then re-tighten the stem bolts. Somewhere between that maximum and minimum is about right.
In summary, release the stem bolts before adjusting the top cap tightness. Tighten the stem bolts after adjusting, then check. If you see someone trying to adjust the top cap without first releasing the stem bolts, they're being silly.Sometimes parts break. Sometimes you crash. Sometimes it’s your fault.0 -
My understanding is that you need the steerer to be slightly short as the top cap sits inside the spacer/stem by a couple of mm. If the steerer is cut flush then the top cap won't be able pre load the bearings.
Also, the expander bung supplied is designed to give the steerer support by sitting near the top and should prevent the stem from crushing the top of the steerer.
Someone correct me if any of that's rubbish.0 -
Thanks chaps, most helpful.0
-
Thanks from me as well. This is the finalist of final bits of my build and the bit I was least sure about.
Graham. 0
0 -
@patrickf - correct. If you go to the Scott website, they advocate the 'cut steerer slightly short' method for the SL. Apparently some manufacturers advise the '5mm spacer above the stem' method and people are adopting this as their default. For some reason, people are almost religious about this topic....0
-
Review of the replacement for the CR1 http://www.bikeradar.com/road/gear/cate ... 0-14-474480
-
Just in case anyone else asks, here's Scott's instructions. It says you can use up to 5mm above.
http://assets.scott-sports.com.s3.amazo ... ral_en.pdf
Never use more than 40mm stack height of spacers between headset and stem.
Do not use more than 5mm stack height of spacer above the stem between the topcap of the headset and the stem.
Do use minimum 5mm stack height of spacer below the stem between the cap of the headset and the stem.
1. The fork steerer, especially in case of a carbon steerer, must be assembled with the originally supplied internal expander wedge
2. NEVER use on carbon fork steerers a standard star flanged nut
3. When cutting the steerer tube use handtools only. Do not use a power saw or a speed cutter but use a hand saw with a fine blade for metal cutting.
4. Once the steerer tube is cut to the desired length, be sure to remove all burrs at the top of the steerer tube
Make sure to wear appropriate safety protection, safety goggles, gloves and breathing mask. Avoid inhaling the carbon dust.
5. Loosen the Expander slightly with an 8mm Allen Key at (A) so the wedge (B) at the bottom of the Expander moves, (make sure not to over loosen as the Expander will not tighten when inserted into the steerer).
6. Slide the Expander into the Carbon Steerer until it is flush with the top of the steerer.
7. Tighten the Expander with the 8mm Allen key at (A) to a torque of 8/9NM pressure, making sure that the Expander stays flush to the top of the steerer and doesn’t lift slightly.
8. Clamp the stem onto the steering tube with a maximum of 5-7Nm and respect also the maximum torque indication of the stem supplier. The lower value indicated on those items has to be accepted as a maximum torque.
9. Make sure the stem has no sharp edges on the contact area for the steerer or the handlebar. This could result in serious accidents.0 -
Bloody hell never knew about the 40mm maximum between the stem and headset.
I have the flared spacer and then another of the supplied spacers which I'm sure is more than 40mm.
This may explain the problems I have clamping down the headset.
I also found I had to use an alloy spacer above the stem to clamp the top cap on as a carbon would not clamp enough force.
Saw coming out tonight!0 -
I've not got the spacers here but I'd have thought the bottom flared spacer + 1 other spacer is about 40mm. So should be fine.0
-
patrickf wrote:I've not got the spacers here but I'd have thought the bottom flared spacer + 1 other spacer is about 40mm. So should be fine.
But if 40mm is less or equal to the flared spacer plus one, what is the point of them supplying more spacers than that......?
From memory there are 3 disc ones of differing heights?Felt F70 05 (Turbo)
Marin Palisades Trail 91 and 06
Scott CR1 SL 12
Cannondale Synapse Adventure 15 & 16 Di2
Scott Foil 180 -
Am I the only person who is even more firmly of the opinion that ANYTHING to do with the headset is basically akin to the black arts and involves priests, sacrifices and nervous virgins?Chunky Cyclists need your love too! :-)
2009 Specialized Tricross Sport
2011 Trek Madone 4.5
2012 Felt F65X
Proud CX Pervert and quiet roadie. 12 mile commuter0 -
I'll watch out for your sacrifice on the commute from workKieran_Burns wrote:Am I the only person who is even more firmly of the opinion that ANYTHING to do with the headset is basically akin to the black arts and involves priests, sacrifices and nervous virgins? 0