Thread To Tell Everyone What Fettling You've Just Done
Comments
-
Fettled the annoying creak out of the seatpost/saddle of the boardman.
I need a new saddle as its so uncomfortable."If you always do what you've always done, you'll always get what you've always got."
PX Kaffenback 2 = Work Horse
B-Twin Alur 700 = Sundays and Hills0 -
Using the Campag-supplied connector-pin I can sympathize. Not a good solution. A few months ago I got 2 KMC Missing Link connecting-links and fitted them to my two Campag Record-11 chains. I got the 10-speed connecting links, not the 11, as the 10-speed is "re-usable" and the 11 apparently not. I did a lot of research and decided it was going to be fine.Il Principe wrote:Fitted a Record 11/23 cassette and new Chorus chain to the Dogma. Fitting the new 11 speed Campag chains is a PITA, will stick with KMC in the future. Also reset and zeroed the front and rear derailleur (with the help of youtube). It was pretty straightforward even for me.
I now remove and clean my chain every weekend (2 white spirit rinses plus 2 3-min runs through ultrasonic cleaner) it's so easy.
The 10-speed link on the 11-speed chain has been absolutely fine, as I had been led to believe.Dolan Titanium ADX 2016
Ridley Noah FAST 2013
Bottecchia/Campagnolo 1990
Carrera Parva Hybrid 2016
Hoy Sa Calobra 002 2014 [off duty]
Storck Absolutist 2011 [off duty]
http://www.slidingseat.net/cycling/cycling.html0 -
Ah silly me I almost forgot.
If you're eating you might want to stop or finish before reading what I'm about to say.
Finished? Good
Well about this time of year the heat gets up a bit and I tend to up my mileage as well and about the same time my normal saddle sore pimple or two can become a third ball, filled with different coloured juices.
Before you ask no hygiene isn't the issue.
Anyway I grew tired of squeezing / draining these bad boys several times a day and finally just taped them over with that super sticky zinc tape.
Problem temporarily resolved of course latter removal is going to be interesting.
Smooth and pimply as a babies bum.
As you wereRule #5 // Harden The Feck Up.
Rule #9 // If you are out riding in bad weather, it means you are a badass. Period.
Rule #12 // The correct number of bikes to own is n+1.
Rule #42 // A bike race shall never be preceded with a swim and/or followed by a run.0 -
That is handy, I have a sore atm.
Will seek out some zinc tape."If you always do what you've always done, you'll always get what you've always got."
PX Kaffenback 2 = Work Horse
B-Twin Alur 700 = Sundays and Hills0 -
Never had problems with saddle sores before, but a few weeks back switched to a fizik arione (I only got a new saddle because my old one snapped!). Was fine at first, but then, wowsers got a massive lump right on the sit bones! Didn't change anything else, jus the saddle. Same height & position, same bibs.
Gonna have to change saddles again I think.0 -
It might be the heat, more sweating can cause problems even if everything else is the same"If you always do what you've always done, you'll always get what you've always got."
PX Kaffenback 2 = Work Horse
B-Twin Alur 700 = Sundays and Hills0 -
I should probably remember to tighten the clamps that hold the levers on to the bars prior to riding...Sometimes parts break. Sometimes you crash. Sometimes it’s your fault.0
-
A thorough clean of the drive train. Chain off and degreased, chainwheel sprayed with degreaser and wiped clean and same for the freewheel. Probably over lubed the chain but will wipe the excess off now.I've added a signature to prove it is still possible.0
-
Reset my seatpost with new BBB torque wrench0
-
Followed kbs advice while replacing the pads. Works a treat."If you always do what you've always done, you'll always get what you've always got."
PX Kaffenback 2 = Work Horse
B-Twin Alur 700 = Sundays and Hills0 -
Chunky Cyclists need your love too! :-)
2009 Specialized Tricross Sport
2011 Trek Madone 4.5
2012 Felt F65X
Proud CX Pervert and quiet roadie. 12 mile commuter0 -
Kieran_Burns wrote:Noticed the brakes weren't oriented correctly... BB7s
So I did the combination trick which seems to always work first time with me:
Release (loosen) both bolts holding brake caliper to frame
Release both pads as far out as possible
Insert business card between fixed (inner pad) and disc
Tighten fixed pad in to disc until card is tight (but not stupidly so) against disc
Brake on hard
Tighten bolts holding caliper to frame, alternating between two so you evenly tighten them
Release brake
Rotate pad adjusters until JUST missing on inner (fixed) and outer (moveable) pads
Pads are now perfectly aligned and minimal movement is required from levers. (as I found out when I almost went over the bars this morning....)
Interesting, KB. Do you end up with the caliper in the recommended 2/3-1/3 position on the disc? I assume that's partially what the business card does for you though are can't picture where you end up. At least I have something to do with all those business cards I end up with after I've changed jobs (does anybody actually use them anymore?)ROAD < Scott Foil HMX Di2, Volagi Liscio Di2, Jamis Renegade Elite Di2, Cube Reaction Race > ROUGH0 -
-
Drew123 wrote:Kieran_Burns wrote:Noticed the brakes weren't oriented correctly... BB7s
So I did the combination trick which seems to always work first time with me:
Release (loosen) both bolts holding brake caliper to frame
Release both pads as far out as possible
Insert business card between fixed (inner pad) and disc
Tighten fixed pad in to disc until card is tight (but not stupidly so) against disc
Brake on hard
Tighten bolts holding caliper to frame, alternating between two so you evenly tighten them
Release brake
Rotate pad adjusters until JUST missing on inner (fixed) and outer (moveable) pads
Pads are now perfectly aligned and minimal movement is required from levers. (as I found out when I almost went over the bars this morning....)
Brilliant - been looking for an easy to follow way to do this. All nicely aligned now and tested on the way home. Can I remove the business card yet as I need to phone the plumber whose business card I used to fix our leaking shower tray?
Just did this. Brilliant and easy0 -
meanredspider wrote:Kieran_Burns wrote:Noticed the brakes weren't oriented correctly... BB7s
So I did the combination trick which seems to always work first time with me:
Release (loosen) both bolts holding brake caliper to frame
Release both pads as far out as possible
Insert business card between fixed (inner pad) and disc
Tighten fixed pad in to disc until card is tight (but not stupidly so) against disc
Brake on hard
Tighten bolts holding caliper to frame, alternating between two so you evenly tighten them
Release brake
Rotate pad adjusters until JUST missing on inner (fixed) and outer (moveable) pads
Pads are now perfectly aligned and minimal movement is required from levers. (as I found out when I almost went over the bars this morning....)
Interesting, KB. Do you end up with the caliper in the recommended 2/3-1/3 position on the disc? I assume that's partially what the business card does for you though are can't picture where you end up. At least I have something to do with all those business cards I end up with after I've changed jobs (does anybody actually use them anymore?)
I wasn't aware of the 2/3 - 1/3 thing, but I'll explain my logic behind the method.
I've seen two main methods put forward (apart from guess and fiddle lots)
1. Put the brakes on and tighten the bolts. This is favoured by the manufacturers and will kind of work
2. Put the business card inside the inner pad and tighten all the way.
The problem with both these methods is that they distort the brake disc when used with a single caliper brake. The first method depends entirely on where the outer pad is when you start, and the second pushes the entire disc OUT to meet the outer pad.
The outer brake pad is the one that moves and when it encounters the disc, it pushes it until it meets the inner pad. The issue I had was that flexing of the disc changed its orientation, so affecting how it hit the pads. I figured if you could minimise this flexing you would minimise 'spot wear' (where the disc initially encounters the pad) and maximise braking force when the levers are applied. As an aside it naturally orients the caliper and makes brake adjustment easy.
The trick is actually how much you turn the inner pad when holding the card; you need minimal force to hold the card so the inner pad is parallel to the disc. When you apply the brakes the caliper aligns to the disc and you carefully tighten.
I hope that all makes sense.Chunky Cyclists need your love too! :-)
2009 Specialized Tricross Sport
2011 Trek Madone 4.5
2012 Felt F65X
Proud CX Pervert and quiet roadie. 12 mile commuter0 -
Thanks, KB - yes, your method seems sound.
Have you looked at the Volagi method?
https://m.youtube.com/watch?v=Ch0OlelgFaA
They explain the 2/3-1/3 thing - that's the most fiddly bit. Not dissimilar from your method but no braking.
Loosen caliper (and cable)
Wind in both adjusters tight-ish to get the correct position
Tighten progressively the two mounting screws
Re-attach cable (lifting lever slightly off stop for better brake feel)
Wind back both adjusters to achieve free rotation (2-3 clicks)ROAD < Scott Foil HMX Di2, Volagi Liscio Di2, Jamis Renegade Elite Di2, Cube Reaction Race > ROUGH0 -
That is so cool.Asprilla wrote:Started some adaptation.
Waiting on a better QR to allow the stem to fold.David
Engineered Bicycles0 -
Roastie wrote:
That is so cool.Asprilla wrote:Started some adaptation.
Waiting on a better QR to allow the stem to fold.
It might be less cool when I try steering it. I've spoken to others who have done it and they reckon it's not too bad.Mud - Genesis Vapour CCX
Race - Fuji Norcom Straight
Sun - Cervelo R3
Winter / Commute - Dolan ADX0 -
Bearing in mind I can barely change a tyre.... I have successfully swapped my Sora shifters (with thumb shifters) to Tiagra ones. Cabled up the brakes and gears as well which I'm classing as a major achievement for me
 0
0 -
ad_snow wrote:Bearing in mind I can barely change a tyre.... I have successfully swapped my Sora shifters (with thumb shifters) to Tiagra ones. Cabled up the brakes and gears as well which I'm classing as a major achievement for me

Well done; it's easy, innit? 99% of bikes is just levers, cables, and gears.
Word to the wise: Really, really, REALLY pull your brake levers to make sure the cables don't move and the housing is sound. Then go for a short ride and do the same. Try not to land on your face while doing so, as it's fairly difficult to style out a fall while biting through your own forehead.Sometimes parts break. Sometimes you crash. Sometimes it’s your fault.0 -
TGOTB wrote:
Keep us posted; this is the one thing I haven't managed to do successfully (which is somewhat compromising the fold)...Asprilla wrote:Started some adaptation.
Waiting on a better QR to allow the stem to fold.
Still awaiting a better (metal closed cam) qr and I've ordered some black mudguards as I noticed the front one was cracked.
Also, you forget how much cabling a Brompton needs so I've had to order another set of outers for the rear brake.
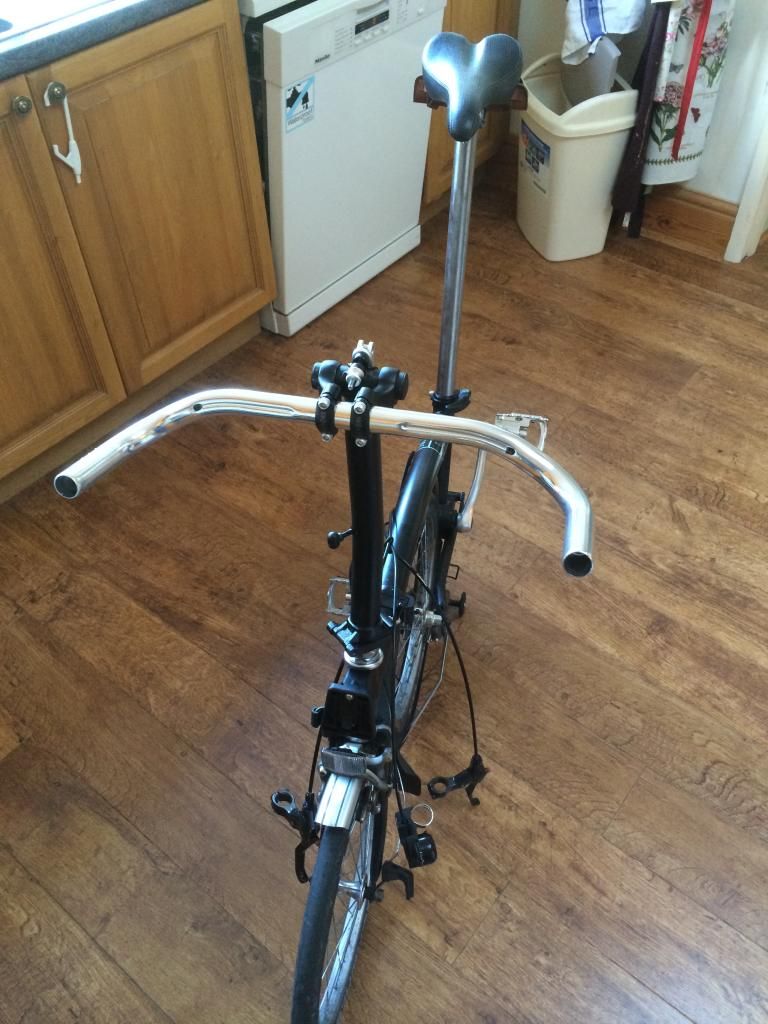
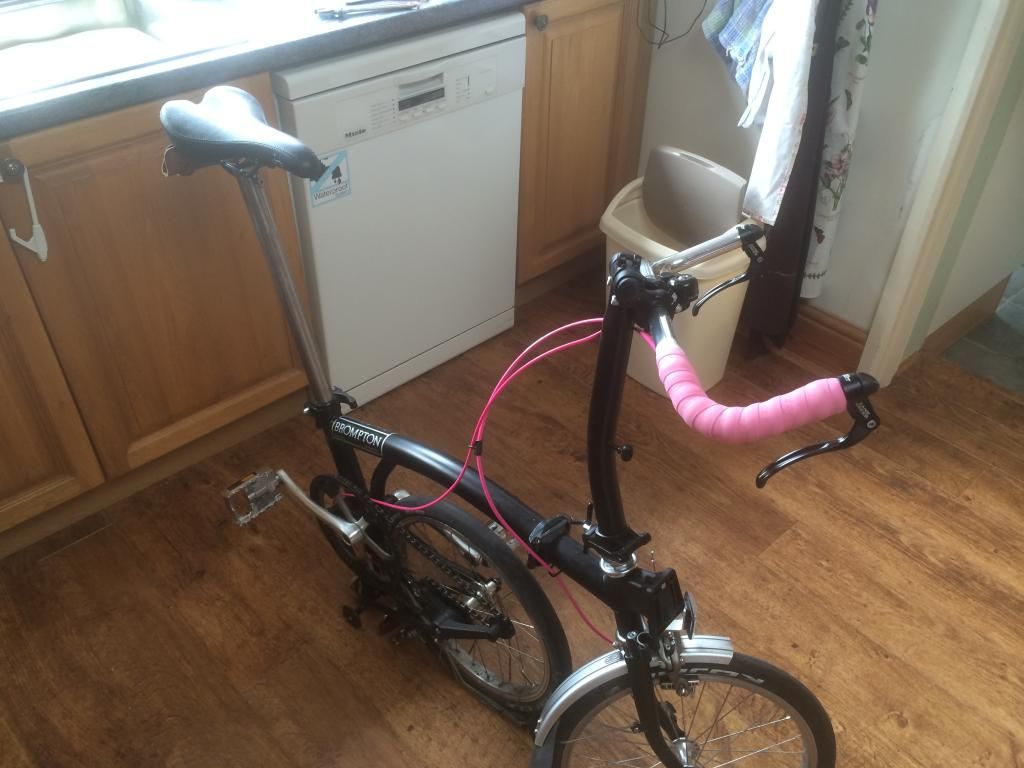
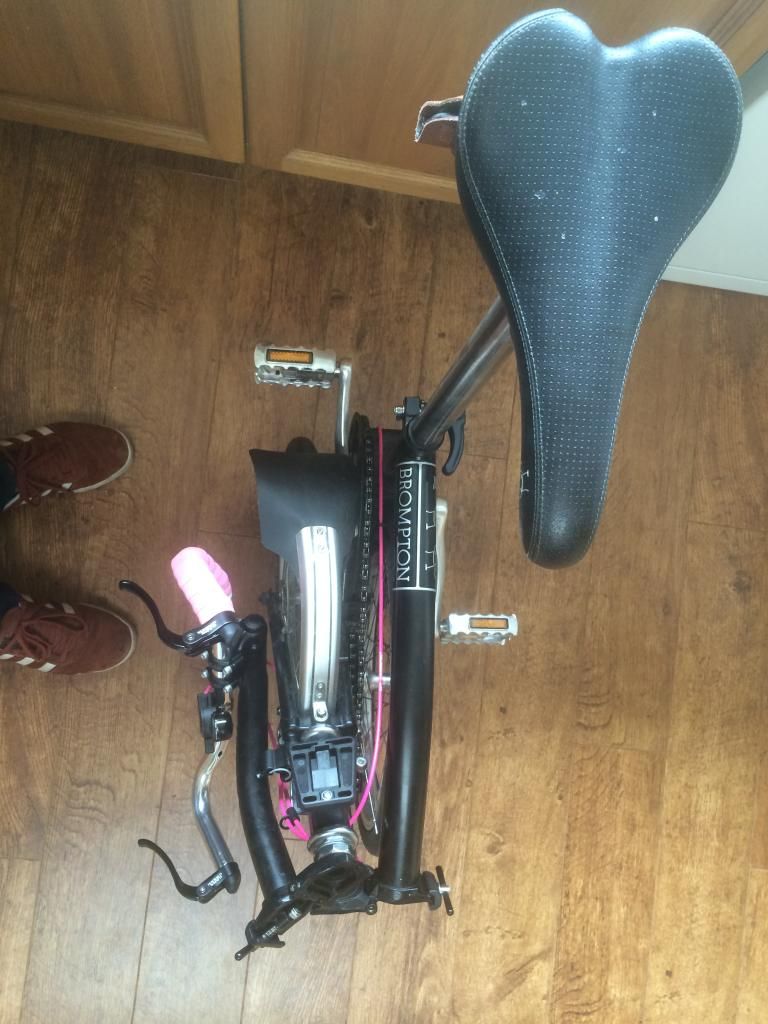
Finally, I've never wrapped pursuit bars with TT levers, so that's a learning curve.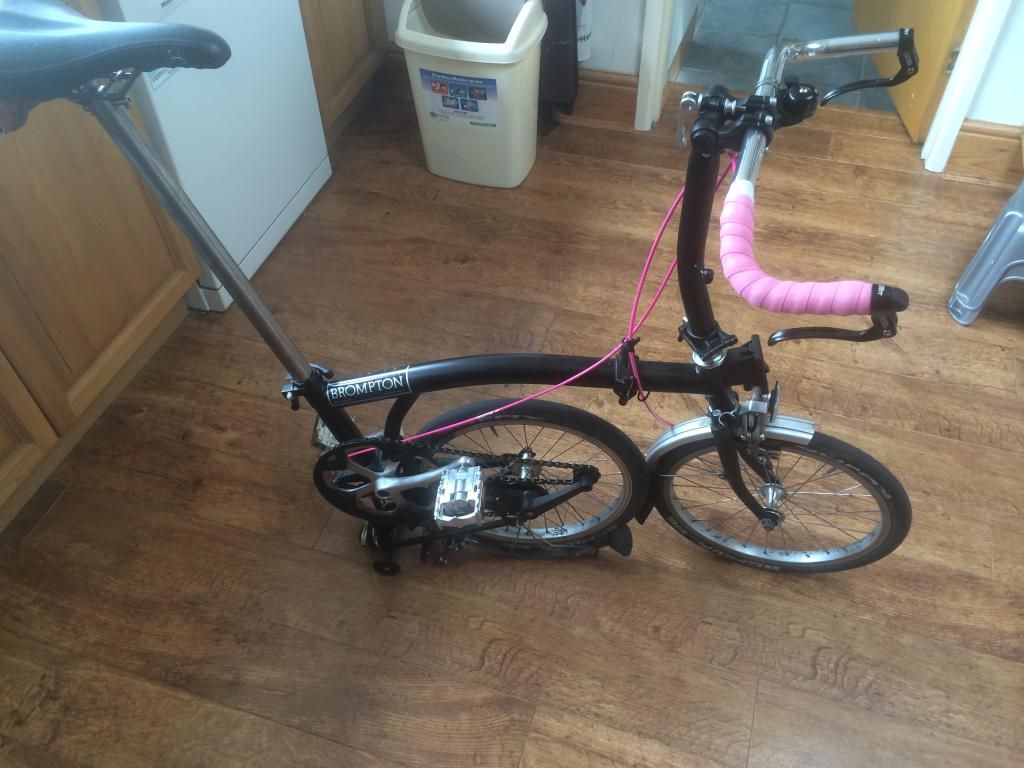
Fold is a little compromised. If folds normally, just the bars stick out somewhat. The stem doesn't centre on the hub so you'd need a 44cm (or more!) pair of bull horns for them to settle around the wheel and guards.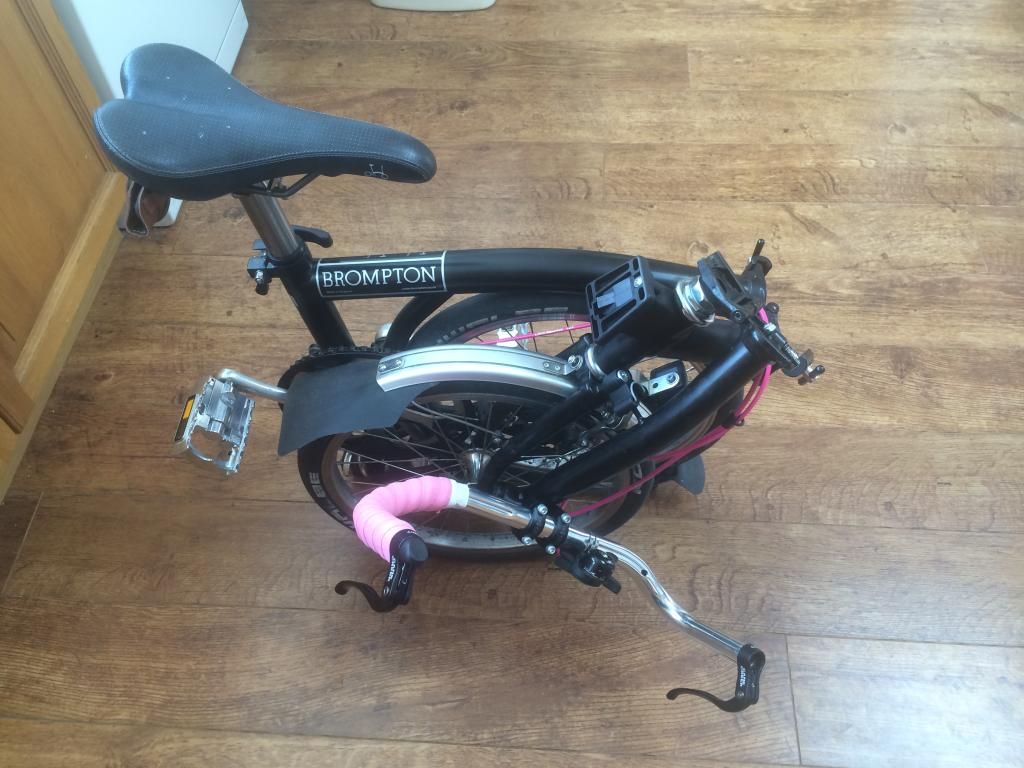
I need to fiddle with the position of the bars in the stem adjuster to see if I can get them flatter against the wheel.Mud - Genesis Vapour CCX
Race - Fuji Norcom Straight
Sun - Cervelo R3
Winter / Commute - Dolan ADX0 -
WTF is that? :shock:


 0
0 -
Nice! I have similar bars mounted directly into the existing stem, but that leads to a position that's a fair bit shorter than a road bike, and the single allen bolt has to be torqued up super-mega-ultra tight. Yours looks like it gives a much better position.
I also managed to add a bar-end shifter, but that was pretty fiddly...Pannier, 120rpm.0 -
vermin wrote:WTF is that? :shock:


Fear incarnate.
Or a Pursuit Brompton.
I'm speaking to some local frame building / machining guys about getting some suitable 11t and 14t sprockets made as the current 12/16 combination isn't much use in London.Mud - Genesis Vapour CCX
Race - Fuji Norcom Straight
Sun - Cervelo R3
Winter / Commute - Dolan ADX0 -
-
Are you going for the one sided tape look?
also are you a Giro winner? "If you always do what you've always done, you'll always get what you've always got."
PX Kaffenback 2 = Work Horse
B-Twin Alur 700 = Sundays and Hills0 -
Might it be easier to chage the chainring? Last time I was at the BWC, there were all sorts of non-standard chainrings in evidence...Asprilla wrote:I'm speaking to some local frame building / machining guys about getting some suitable 11t and 14t sprockets made as the current 12/16 combination isn't much use in London.Pannier, 120rpm.0 -
TGOTB wrote:
Might it be easier to chage the chainring? Last time I was at the BWC, there were all sorts of non-standard chainrings in evidence...Asprilla wrote:I'm speaking to some local frame building / machining guys about getting some suitable 11t and 14t sprockets made as the current 12/16 combination isn't much use in London.
If you go over 56t then the clip that attaches the front wheel to the seat stay in the fold is impeded. I'm looking for something I can use everyday.Mud - Genesis Vapour CCX
Race - Fuji Norcom Straight
Sun - Cervelo R3
Winter / Commute - Dolan ADX0 -
rubertoe wrote:Are you going for the one sided tape look?
also are you a Giro winner?
Bromptons need longer cable runs for the brakes than a standard bike and I didn't buy enough outer to do the other side.
I just like black and pink.Mud - Genesis Vapour CCX
Race - Fuji Norcom Straight
Sun - Cervelo R3
Winter / Commute - Dolan ADX0
