Wheel truing stand: Yes or no?
Comments
-
OK, Oliver you have inspired me. I have just bought a sheet (A4) of gloss black plastic for £2.75 on the 'bay. Will be heading off to B&Q this weekend for the flat steel.+++++++++++++++++++++
we are the proud, the few, Descendents.
Panama - finally putting a nail in the economic theory of the trickle down effect.0 -
Nice one. Good luck. If you want to check they have it in stock here is the EAN code 3232630200650 . Just put it in the search box on DIY.com then do a stock check.0
-
I have now completed a wooden wheel dishing gauge based on the cardboard design in the Professional Guide to Wheel Building book. I have added a wheel rim measuring ruler to the gauge as well. This is a 1000mm ruler cut off at 340mm so it will read rim diameter directly using 2x 200mm spokes. the 200mm spokes are stored on the stand when not needed.
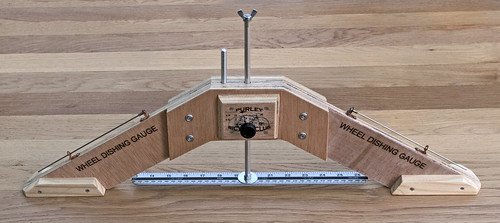
IMG_7601_02 by Brett Oliver, on Flickr
In wheel dishing mode the ruler is pulled out and replaced by the indicator stored in the top of stand.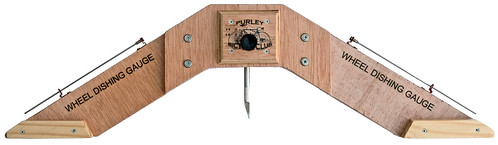
Bicycle wheel dishing gauge by Brett Oliver, on Flickr
To measure rim diameter the gauge sits across the wheel rim and the ruler is lowered to the level of the spoke holes.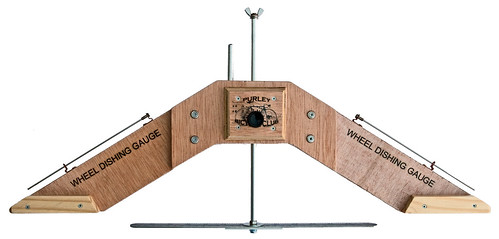
Wheel Rim diameter measuring gauge by Brett Oliver, on Flickr
continued on next post.........0 -
from previous post
The 200mm spokes are inserted and rest on the ruler. The dishing gauge is then moved so that the left hand spoke indicates 400mm on the ruler. The right hand spoke now indicates the rim diameter.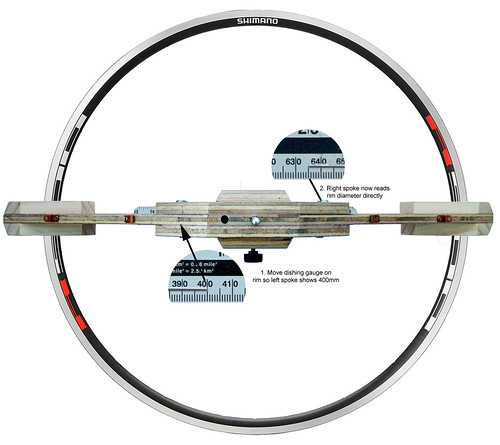
Rim diameter measuring by Brett Oliver, on Flickr
The same pic with the dishing stand cut away for clarity.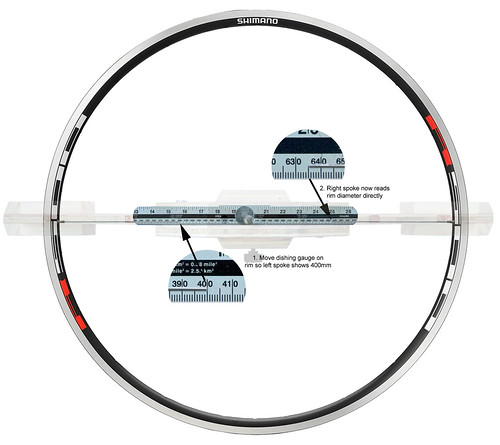
Rim diameter measuring cutout by Brett Oliver, on Flickr0 -
Now you are just showing off
") 0
0 -
:-)
Trying to make a Nipple Driver. I thought this would be the easy bit.
First driver too brittle just snapped 2nd just won't bend.
Anyone know a cheap screwdriver that will bend without snapping?0 -
You might be better off sourcing some 4 or 6 mm bar and making it from scratch, failing that, if you can remove the handle and have a blow torch, you could try annealing it to un-harden the metal, see:
http://wolfstone.halloweenhost.com/Tech ... aling.html
if you drag a file across a bit of bar, or a screwdriver, it should be fairly easy to see if it is hardened by whether it scratches the surface easily or skids off. Most if not all screwdrivers should at least be surface hardened to prolong life.0 -
And to anyone drilling 6mm plate:
start by marking where you want you hole, and use a centre punch or other hard pointy thing and a hammer to whack a dimple where you want to hole to start. This will give the tip of the drill somewhere to rest and help stop it wandering when you start.
Next use a smaller drill, 3 or 4mm say to drill a pilot hole carefully where the dimple is.
Finally use your 10mm drill and carefully drill out to size, the pilot hole will ensure the drill stays in place.
When drilling steel keep your drill RPMs low, 900rpm is MORE than enough, and if you use stainless keep it below 700rpm if possible, this will make it easier for you to maintain the pressure, any faster and you risk dulling the drill and making life hard for yourself. and on stainless you could also work harden the metal if you are not careful (so normal mild steel is definitely best!)0 -
Thanks for the info gosport_commuter.
I will be getting my blowtorch out Saturday.0 -
symo: I used these guys sales@e-metalstock.co.uk http://stores.ebay.co.uk/e-metalstock
If you've got time to wait then go through all the ebay stores who sell steel flat bar and see if they do custom stuff.
The one I used wasn't 'cheap' at £28 +VAT, but they did it quickly, and when they missed the post for the day they said they'd send it they used a next day courier instead for no extra cost.
The plastic was just a £2 sheet of acrylic from ebay.
And just follow Roger Musson's guide and it all seems to work surprisingly easily.0 -
Thanks for the link gosport_commuter
Played around with a blow lamp and a 6mm offset screw driver and managed to bend it. The offset screw driver was already bent at one end so heating it and bending it further down should not soften the hardened end.
A bit of grinding and filing and it was complete. I used an old wooden bradawl for the handle as it was a nice shape.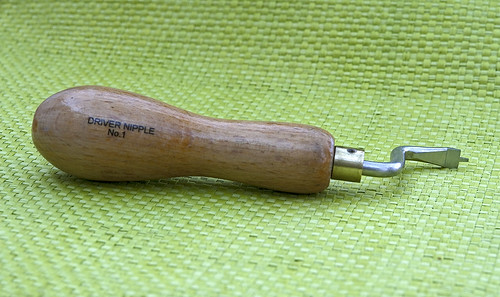 [/url]
Nipple Driver by Brett Oliver, on Flickr0 -
Excellent work! glad to be of service.0
-
Disappointing tale of a visit to wickes, Ply in stock but unable to get it off the shelve owing to the forklift not working!
The metal has however been bought from B&Q, loads in stock.+++++++++++++++++++++
we are the proud, the few, Descendents.
Panama - finally putting a nail in the economic theory of the trickle down effect.0 -
Personally I find its a lucky dip either you true it or your end up forking out plenty of the queens finest to replace the whole thing id rather spend 20 quid getting someone to do it for me than risk it. :oops:cosna kick a bo agen a wo and ed it back till it bos-UP HANLEY ME DUCK
NO STAIRWAY....DENIED!
D.Leyland
Current Bike-TREK 4500
Previous Bikes
:Giant Roam 3
:Bianchi Nirone 70 -
Dannyboy95 wrote:Personally I find its a lucky dip either you true it or your end up forking out plenty of the queens finest to replace the whole thing id rather spend 20 quid getting someone to do it for me than risk it. :oops:
You're underestimating yourself. There's an absurd mystique surrounding wheelbuilding/truing but it's not beyond most people by any means. Wheels aren't complicated, once you've built a couple you know pretty much all you need to know about a bog-standard 3-cross wheel anyway. Just takes a little patience and practice.- - - - - - - - - -
On Strava.{/url}0 -
This!DesWeller wrote:Dannyboy95 wrote:Personally I find its a lucky dip either you true it or your end up forking out plenty of the queens finest to replace the whole thing id rather spend 20 quid getting someone to do it for me than risk it. :oops:
You're underestimating yourself. There's an absurd mystique surrounding wheelbuilding/truing but it's not beyond most people by any means. Wheels aren't complicated, once you've built a couple you know pretty much all you need to know about a bog-standard 3-cross wheel anyway. Just takes a little patience and practice.
I was pleasantly surprised, approach it in a methodical way and it should work.0 -
+2bails87 wrote:
This!DesWeller wrote:Dannyboy95 wrote:Personally I find its a lucky dip either you true it or your end up forking out plenty of the queens finest to replace the whole thing id rather spend 20 quid getting someone to do it for me than risk it. :oops:
You're underestimating yourself. There's an absurd mystique surrounding wheelbuilding/truing but it's not beyond most people by any means. Wheels aren't complicated, once you've built a couple you know pretty much all you need to know about a bog-standard 3-cross wheel anyway. Just takes a little patience and practice.
I was pleasantly surprised, approach it in a methodical way and it should work.
Just prior to starting this thread I did all my own maintenance on the bikes with the exception of wheels - I had a mental block like the one stated above. Anyway, I've now built a rear wheel (with the help of Roger Musson's book) which is still true after nearly 1000 miles plus I've trued the wheels on my road bike and replaced a couple of broken spokes (and I'd not touched that wheel before so they didn't break due to my tinkering!) on my rat bike.
Added to which, even if you do mess up, provided you stop before it gets too bad, you only need to pay the £20 that you would have paid anyway to sort it out...
_0

![http://farm2.static.flickr.com/1004/1230632858_ee7cba3cee_b.jpg[/url]](/home/leaving?allowTrusted=1&target=http%3A%2F%2Ffarm2.static.flickr.com%2F1004%2F1230632858_ee7cba3cee_b.jpg%5B%2Furl%5D)