Wheel truing stand: Yes or no?

Underscore
Posts: 730
Hi all,
While I've done pretty much all my own maintenance, I've always had a mental block on truing wheels. Anyway, yesterday my Spokey Pro arrived from CRC and I had a go at truing the rear wheel on my old clunker that I'm resurrecting to ride to the train station. To my astonishment, I managed to end up with a wheel which was closer to true than when I started!
So, no that I've the confidence to go and mess up the wheels on all my bikes, I was wondering whether a truing stand is worth the money to make it easier? I'm a firm believer in having the right tool for the job but I've no desire to spend the money if resting a finger against the brake block is just as effective...
If so, is the Park Tool TS-8 (£80) worth the extra over the Minoura Pro (£73)?
TIA,
_
0
Comments
-
There is nothing quite like using the right tool. Using your finger on a brake block will work
but sure sounds like a pain in the *ss to me. As for buying a top line truing stand I don't believe they are necessary for the home shop. Although, they sure are nice. There seem to be plenty of perfectly suitable, lower end, truing stands out there. If you're going to give building wheels a try(and you should - it's not that difficult). I would advise also getting a dishing tool, nipple driver, and a spoke tension guage(from Park).0 -
Thanks Dennis. Agreed about not getting a top end truing stand - I could buy a couple of new wheel sets for the price of a TS2. I reckon that the TS-8 or Minoura Pro are only a little above the cheapest out there (that I've been able to find) so should be about the right price point for a home mechanic.
I reckon that the rear wheel on my commuter will need replacing soon - the braking surfaces are looking pretty worn - so I am tempted to have a go at building a replacement wheel. The Park tension meter seems pretty pricey for what it is though. Might try using Sheldon Brown's tensioning by musical note approach...
_0 -
Underscore wrote:Thanks Dennis. Agreed about not getting a top end truing stand - I could buy a couple of new wheel sets for the price of a TS2. I reckon that the TS-8 or Minoura Pro are only a little above the cheapest out there (that I've been able to find) so should be about the right price point for a home mechanic.
I reckon that the rear wheel on my commuter will need replacing soon - the braking surfaces are looking pretty worn - so I am tempted to have a go at building a replacement wheel. The Park tension meter seems pretty pricey for what it is though. Might try using Sheldon Brown's tensioning by musical note approach...
_
I understand about the tension meter being pricey. I have one because I don't build many sets of wheels and don't think I have enough experience to really tell anything about spoke tension via the sound or touchy - feely techniques. If I built more wheels I'm thinking I might get more of a feel for it but...... In any case a well and evenly tensioned wheel is a wheel that will stand up to more abuse than one simply thrown together.
Gerd Schraner's - The Art of Wheel Building is a great place to start.0 -
Never needed one, always trued wheels againts the brake blocks, works for me!!Bike one Dawes Acoma (heavily modified)
Bike two (trek) Lemond Etape (dusty and not ridden much)
Bike Three Claude Butler chinook, (freebee from
Freecycle, Being stripped and rebuilt
(is 3 too many bikes)0 -
To tweak a wheel I use the brakes, to do it properly I remove the brake and bluetack a ruler across the frame, that way you can make sure the dish is right as well, something you can't really do using the brakes, its also easier to get that last 'little bit' as you can measure and move rather than trying to find high spots.
SimonCurrently riding a Whyte T130C, X0 drivetrain, Magura Trail brakes converted to mixed wheel size (homebuilt wheels) with 140mm Fox 34 Rhythm and RP23 suspension. 12.2Kg.0 -
I don't have a stand but have a tension meter.
I've found once i've got pretty much even tension in all spokes the fine tuning is pretty easy.
(I've only ever built wheels for my fixed bike so no dish needed)0 -
I can true in the frame, but once you use a stand (I use to use a Park), it is easier, and you get better results.0
-
Agreed if you can afford it get the stand. For starters it means you can sit down at a table/workbench with the stand in front of you and take your time. With the wheel in the frame you often have to sit/stand in an uncomfortable position to do the work.supersonic wrote:I can true in the frame, but once you use a stand (I use to use a Park), it is easier, and you get better results.
I've got the Minoura stand. No problems using it so far for truing wheels or replacing spokes. Haven't tried a wheel build yet but I do plan to give it a go.
Mike0 -
Thanks g(uy|al)s. Looks like I might give one or other stand a go. I've got 5 or 6 wheels that could do with truing so I quite like the idea of a comfortable position!
_0 -
I'm not sure about the Minoura stand but I recently used the Park TS8 and was very disappointed. Loads of flex and the wheel keeps moving.
I recently decided to take the plunge and buy a stand. Folk on here recommended the Minoura or the M-Wave stand at that sort of price point and I was torn between the 2.
In the end, I got offered a great deal on the mighty Park TS2.2. A bit more than I wanted to spend but it really is the Rolls Royce of wheel truing stands.0 -
Make your own stand. Go to wheelpro.co.uk, buy the (pdf) book by Roger Musson, make a stand like he has (cost less than a tenner, only basic DIY skills needed) and away you go. Much more satisfying than buying a stand. And if it turns out you haven't the patience for truing, then you've not wasted much money.0
-
Tail end Charlie wrote:Make your own stand. Go to wheelpro.co.uk, buy the (pdf) book by Roger Musson, make a stand like he has (cost less than a tenner, only basic DIY skills needed) and away you go. Much more satisfying than buying a stand. And if it turns out you haven't the patience for truing, then you've not wasted much money.
I use the rear triangle of an old 'box-tubed' Marin that I hack-sawed off. Sits nicely on its own, and I use old cones/spacers to re-space it for road/front/track.
You do definatley get better results if you're sat down and taking your time, especially for wheel-builds.FCN16 - 1970 BSA Wayfarer
FCN4 - Fixie Inc0 -
Tail end Charlie wrote:Make your own stand. Go to wheelpro.co.uk, buy the (pdf) book by Roger Musson, make a stand like he has (cost less than a tenner, only basic DIY skills needed) and away you go. Much more satisfying than buying a stand. And if it turns out you haven't the patience for truing, then you've not wasted much money.
I thought that I would update this thread with what happened and my thoughts in case anyone comes across it when searching.
I bought Roger Musson's e-book and have to say that it is a very good purchase. I thought about building my own truing stand but, with 3 sons under 5, time is at a premium and I came across the Webbline stand:
It's £45 plus shipping (which brings it to just over £50). When it arrived, I was a bit underwhelmed. The quality is pretty... well... basic and it's not built as square as I was expecting. However, it holds the wheel very solidly and, last night, I finished my first wheel - 36h Mavic Open Sport on Deore hub with Sapim single butted spokes (drive-side) and double butted (non-drive-side).
I have to say that the truing stand did exactly what I needed - and exactly what I worried about other cheap stands being able to do. I'm also very glad that I bought Roger's book, which I used to make my own nipple driver and dishing gauge, as well as having followed his instructions for the build itself.
HTH,
_0 -
Sorry for the necro thread.
I am about to build the wheelpro stand from Rogers excellent book, only issue is that I cannot get hold of any 20mm thick mdf or plywood around here in Fleet. I have emailed Roger asking him if it HAS to be 20mm thick wood throughout (I can only get 18mm). However he is away on holiday so I am stuck at the moment unless one of you chaps knows the answer.+++++++++++++++++++++
we are the proud, the few, Descendents.
Panama - finally putting a nail in the economic theory of the trickle down effect.0 -
I also got the book recently and am about to start on the stand. I would have thought that 20mm is recommended for rigidity, so dropping to 18mm is not a huge deal only 10% less. I would go for ply rather than MDF as I think that would be stronger. MDF also tends t oswell up if it gets damp.symo wrote:Sorry for the necro thread.
I am about to build the wheelpro stand from Rogers excellent book, only issue is that I cannot get hold of any 20mm thick mdf or plywood around here in Fleet. I have emailed Roger asking him if it HAS to be 20mm thick wood throughout (I can only get 18mm). However he is away on holiday so I am stuck at the moment unless one of you chaps knows the answer.0 -
Veronese68 wrote:
I also got the book recently and am about to start on the stand. I would have thought that 20mm is recommended for rigidity, so dropping to 18mm is not a huge deal only 10% less. I would go for ply rather than MDF as I think that would be stronger. MDF also tends t oswell up if it gets damp.symo wrote:Sorry for the necro thread.
I am about to build the wheelpro stand from Rogers excellent book, only issue is that I cannot get hold of any 20mm thick mdf or plywood around here in Fleet. I have emailed Roger asking him if it HAS to be 20mm thick wood throughout (I can only get 18mm). However he is away on holiday so I am stuck at the moment unless one of you chaps knows the answer.
Having bought the book, I built a stand using 18mm MDF (left over from another job, so zero cost) and it works fine. Roger's design includes "butresses" either side of the uprights holding the wheel so flex isn't a problem. Sure that 18mm vs 20mm is not an issue - the important thing is the distance between the uprights, which is variable anyway.
My biggest problem was sourcing something suitable for the axels to sit in (the design is, I think, for 6mm metal sheets). Ended up with a bit of a bodge, taking a view to upgrade in the future.
Failed on making a nipple driver, not having a suitable screwdriver to canibalise. Suggestions welcomed.0 -
OK when I get to the driver I will let you know. I have a vice at home to give it some umph in.+++++++++++++++++++++
we are the proud, the few, Descendents.
Panama - finally putting a nail in the economic theory of the trickle down effect.0 -
Failed on making a nipple driver, not having a suitable screwdriver to canibalise. Suggestions welcomed
I bought B&Q's cheapest. Actually, they were so cheap I bought two in case I screwed the first one up. Then five minutes attacking it with an angle grinder. I didn't bother bending the shaft or making the handle rotate as suggested in the book.My biggest problem was sourcing something suitable for the axels to sit in (the design is, I think, for 6mm metal sheets). Ended up with a bit of a bodge, taking a view to upgrade in the future.
B&Q sell strips of steel. Something like 30mm x 4mm. Then it just needs a little bit of precision machining. Or, if you're like me, butcher it with an angle grinder.
I haven't got an decent pics, but you can just about see it here:
The base board is made out of a cheap shelf which gives a nice white back drop.0 -
Ah, good day at work: built 3 wheels, all rears 2x flip/flop and 1x road
Admittedly, at work I use a Park stand and dishing tool. I've asked work to buy me a nipple driver, but only building a few wheels a week it's not justified (yeah, think I'll buy my own). A nipple driver should have a handle that rotates around the shaft, not just two nicks in the flat blade. I used one when I built a few wheels in Holland and yes they're handy, but I can build, dish, stress and true a wheel in 30-40mins (that's work speed, at home I prefer to take my time and come up with different patterns)
What does come in handy is an old spoke! If you're building a wheel that's deep dish or not double-eyeleted there's a tendency to drop nipples into the rim. So, if you're suffering from this, when putting the nipple into the rim I run an old spoke into the back of the nipple for placement, as you screw the nipple onto the actual spoke you unscrew the old spoke off the nipple, simples! Even better is to deliberately damage the thread of the old spoke by clamping in a vice half way up the thread and then putting a 'Z' bend into the spoke to form a 'handle'. With a bit of fettling with your tool (steady) you can make one that works for you.
Ref: Tensiometers. Good for checking that tension is even around a wheel, but don't set tensions by a given/absract value. Rider weight/intended use, spoke choice, pattern all affect the 'calculated' tension a wheel should be.
I'm lucky enough to have had a few wheels built by Big Al of Wheelcraft. He has a custom jig that uses a roller to measure side-side down to 'thou's and rolls his own (spokes that is) with a spoke roller that cuts to length as it rolls the thread. He got a couple of dies that'll roll different pitches or gauges. It's a joy to watch; he's very good, well priced and very chatty - if you can visit I truly recommend you buy a wheel, but I hope you like strong coffee and endless cycling stories.FCN16 - 1970 BSA Wayfarer
FCN4 - Fixie Inc0 -
Just had an email from Roger Musson. 18mm Plywood is apparently fine.+++++++++++++++++++++
we are the proud, the few, Descendents.
Panama - finally putting a nail in the economic theory of the trickle down effect.0 -
just been into my friendly homebase store and after a quick chat several large sheets of mdf were mine for free. the sheets are 15mm but with beefing up will be fine. where did you guys get the plastic from for the additional bits?0
-
Type "3mm black plastic sheet" into ebay.0
-
Given the amount I buy on eBay I didn't think about looking there . All sorted along with a pair of open pros some 105 hubs nadsome free lessons at my LBS.0
-
gwillis wrote:just been into my friendly homebase store and after a quick chat several large sheets of mdf were mine for free. the sheets are 15mm but with beefing up will be fine. where did you guys get the plastic from for the additional bits?
Got mine from a signmakers. Gave me the offcuts for free.0 -
Just built a wheel truing stand based on Roger Musson's book. I used mainly what wood and hardware I had
laying about.
I used an old bit of mahogany for the base but only had pine for the uprights.
I had to buy the steel bar from B&Q they sell lengths of 30mm x 6mm. To make the slots I drilled 2 x 10mm
holes first then cut the bar across at the top of the holes with a hacksaw. To finish just trim of the sides
off the holes to give a nice round bottomed slot like real forks.
I used a pair of old cantilever brake arms to hold pointers mounted off the wooden uprights by threaded rods
through metal tubing. The brake arms allow all round adjustment of the measuring rods as I have mounted them
in the brake block mounting hole. I have substituted wing nuts in place of the original nuts so they can be adjusted
by hand. The pointers have plastic inserts glued in to protect my rims.
The radial gauge is made from a dial gauge (over the top really) the adjustable arm the gauge is mounted on
would do just as well but it looks nice. It can be mounted back on it's original magnetic stand when needed
by undoing 1 nut. The dial gauge and adjusting stand are bolted to a radial bracket to allow all round
adjustment.
When the photos were taken I was still waiting for my M8 wing nuts to arrive from EBAY these will be used on
the adjustable upright and the radial bracket in place of the 3 M8 dome nuts.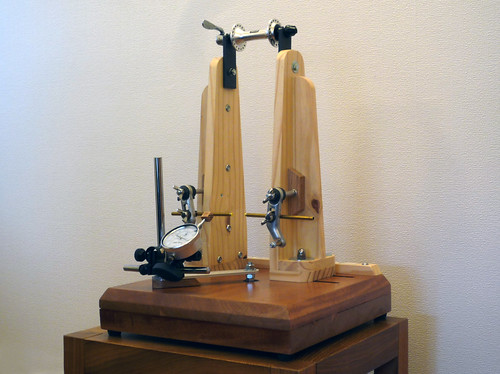
Bicycle Wheel Truing Jig by Brett Oliver, on Flickr
Bicycle Wheel Truing Jig by Brett Oliver, on Flickr
See more larger images here in my Flickr set http://flic.kr/s/aHsiRZxmAi0 -
Just been quoted £90 + VAT to have the metal brackets and plastic bits made!!!!!!
Anyone care to help me out in getting those brackets made, so far tried 6 small engineering firms and no joy.+++++++++++++++++++++
we are the proud, the few, Descendents.
Panama - finally putting a nail in the economic theory of the trickle down effect.0 -
Just seen olivers post!!!
Nicest truing stand ever??+++++++++++++++++++++
we are the proud, the few, Descendents.
Panama - finally putting a nail in the economic theory of the trickle down effect.0 -
Thanks for the kind comments Gussio & symo.
I found cutting the slot in the 6mm steel bar the hardest thing to do.
I used just basic tools and a length of 30mm x 6mm bar from B&Q.( edit B&Q is a large hardware/DIY store in UK.)
See enclosed pic my slot is round bottomed like the forks on my bike and is made with a 10mm drill along with a hacksaw. Click link for large image.
http://home.btconnect.com/brettoliver1/axil.gif
If you follow the steps in order and drill the hole before cutting the bar to length it is fairly easy to make.
Hope this helps.0

![http://farm2.static.flickr.com/1004/1230632858_ee7cba3cee_b.jpg[/url]](/home/leaving?allowTrusted=1&target=http%3A%2F%2Ffarm2.static.flickr.com%2F1004%2F1230632858_ee7cba3cee_b.jpg%5B%2Furl%5D)