Remove Wiper Seal.

jedi_master
Posts: 888
Bought a new set of foam rings and wiper seals for my forks(2010 Tora 318). Any tips to get the old ones out?
The rockshox guides uses a downhill tyre lever(don't have) or it said you can use a flat blade screw driver with a round shaft. Tried that and it won't budge. Tried my pedros plastic levers, still didn't budge.
The video showing the tyre lever method shows them popping out really easy.
The rockshox guides uses a downhill tyre lever(don't have) or it said you can use a flat blade screw driver with a round shaft. Tried that and it won't budge. Tried my pedros plastic levers, still didn't budge.
The video showing the tyre lever method shows them popping out really easy.
0
Comments
-
Screwdriver should do it, what's it not doing?
Tap under the seal lip using a hammer, lever up. If it won't shift hammer it in a bit more to distort the retaining section.
I use a car trim remover, works great!Currently riding a Whyte T130C, X0 drivetrain, Magura Trail brakes converted to mixed wheel size (homebuilt wheels) with 140mm Fox 34 Rhythm and RP23 suspension. 12.2Kg.0 -
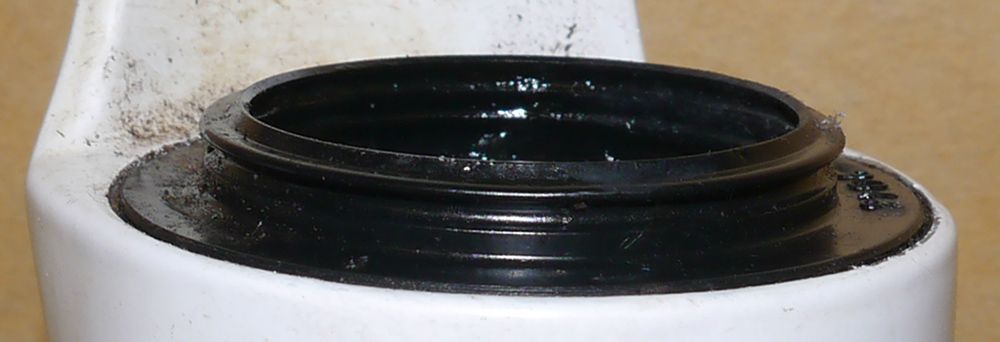
All that's happened is the two sping ring/retainers came off(outer and inner). The seal hasn't budge at all. Screwdriver wasn't a very wide blade, about 4mm wide. The tyre lever is wide though.
Not sure how I would tap under the lip, can't fit a hammer inside the fork leg.0 -
The dust seal has a flange (lip) on it that sits on top of the fork leg, under that.
And with a sensible sized screwdriver!
Flange very obvious? Currently riding a Whyte T130C, X0 drivetrain, Magura Trail brakes converted to mixed wheel size (homebuilt wheels) with 140mm Fox 34 Rhythm and RP23 suspension. 12.2Kg.0
 -
Has no flange that sits on top of the fork. Sits flush with the top.
Got new replacements, thinking of just cutting the olds ones to get them out.0 -
Just stick a decent size screwdriver in there and lever them out, put screwdriver through the centre, don't try and jam it between the seal and fork or you'll damage the fork, stick a bit or rag or something under the screwdriver shaft where you lever off of to protect the fork leg. Need to give it a bit more welly that's all.
I found a piece of 32mm/1" 1/4" waste pipe perfect size to use to refit the seals.0 -
0
-
JGTR wrote:I found a piece of 32mm/1" 1/4" waste pipe perfect size to use to refit the seals.
my car socket sets have all come with that size socket .... never found a use for them as nothing on the car is that big .... until I serviced the forks, they are perfect for replacing the seals
but yes, I concur, large flat crew driver and lever them out, be carefull not to scratch the fork though, I used a cloth around the blade to minimise the damage and worked around the seal just easing it till it started to move0 -
I put a metal tyre lever under the seal - inside the fork, where the foam ring sits, not under the flange.
You have to lever against the other side of the fork which crushes the seal somewhat. So far I have not managed to damage it the seal, but if you're replacing them it doesn't matter if they do.0 -
Dear god, the flange is the big disc sitting on top of the fork right there in your photo, get a decent screwdriver under it!Jedi Master wrote:Has no flange that sits on top of the fork. Sits flush with the top.
Got new replacements, thinking of just cutting the olds ones to get them out.
Compare it to my photo above, its the bit that touches upto the white.Currently riding a Whyte T130C, X0 drivetrain, Magura Trail brakes converted to mixed wheel size (homebuilt wheels) with 140mm Fox 34 Rhythm and RP23 suspension. 12.2Kg.0 -
JGTR wrote:
What that image show, that's what I have tried. Will not budge.The Rookie wrote:Dear god, the flange is the big disc sitting on top of the fork right there in your photo, get a decent screwdriver under it!
Compare it to my photo above, its the bit that touches upto the white.
I know that part is the flandge but your earlier post "flange (lip) on it that sits on top of the fork leg, under that." makes it sound like the flange was actually sitting on top and not recessed in and flush with the top.
Anyway, when you say put a screwdriver under it, you're talking about placing a screwdriver in through the top at an angle so it's under the flange(between it and the foam ringe) like the photo JGTR posted? If so that's what I have tried, even with a decent sized screwdriver and as I said it won't budge.0 -
It's just a rubber ring. It will budge with a bit of force. I go in the bottom where the foam ring is and lever upwards.I don't do smileys.
There is no secret ingredient - Kung Fu Panda
London Calling on Facebook
Parktools0 -
Found a slightly bigger screwdriver and managed to get them out. Had to use a lot of force, a lot more than I thought I would need. Didn't come out no where near as quick and easy as the video show. The video shows them pop out within a couple of seconds and with what looks like very little force at all.0
-
It is sitting on top, some forks have a lip others do not, but its still on top (its not inside!).Jedi Master wrote:
I know that part is the flandge but your earlier post "flange (lip) on it that sits on top of the fork leg, under that." makes it sound like the flange was actually sitting on top and not recessed in and flush with the top.
Maybe fork servicing isn't for you!Currently riding a Whyte T130C, X0 drivetrain, Magura Trail brakes converted to mixed wheel size (homebuilt wheels) with 140mm Fox 34 Rhythm and RP23 suspension. 12.2Kg.0 -
The Rookie wrote:Maybe fork servicing isn't for you!
Charming. Really not need that comment.
I have serviced these and two other forks on a number of occasions and everything has been fine, i'm more than capable of serving them, just never removed the wipers before, let alone stubborn ones.
Yes the recess is at the top of the fork leg, but there is no lip(these forks) that sits on top of the fork leg, it sits in the recess flush with the top. If it had a lip sitting on top it would cover the white paint.0 -
Jedi Master wrote:The Rookie wrote:Maybe fork servicing isn't for you!
Charming. Really not need that comment.
I have serviced these and two other forks on a number of occasions and everything has been fine, i'm more than capable of serving them, just never removed the wipers before, let alone stubborn ones.
Yes the recess is at the top of the fork leg, but there is no lip(these forks) that sits on top of the fork leg, it sits in the recess flush with the top. If it had a lip sitting on top it would cover the white paint.
Don't get too stressed, that's just his way. I'm a qualified panel beater and mechanic, also a plumber and quite often get stuck when fixing my bike and prefer to take care rather than risk damaging an expensive component....it's only easy if you know how!0 -
The fork lower has a lip round where the flange sits, again obvious in your photo.
It was just a bit of jest.
Seriously though there is a flange on top of the fork as originally indicted and shown in the photo, you just need to get something under it and pop it out.
As CD says you can use a longer pry down through the middle of the seal and lever up the base of the seal against the opposite top edge but it's not my preffered route.Currently riding a Whyte T130C, X0 drivetrain, Magura Trail brakes converted to mixed wheel size (homebuilt wheels) with 140mm Fox 34 Rhythm and RP23 suspension. 12.2Kg.0 -
That's what I was trying as that's what guides and videos I see showed, except a downhill tyre lever instead of flathead screwdriver.The Rookie wrote:As CD says you can use a longer pry down through the middle of the seal and lever up the base of the seal against the opposite top edge but it's not my preffered route.
Got them out(few replys up).
Sorted now.0