Fused broken downtube barrel adjuster. SOS!

Hi all,
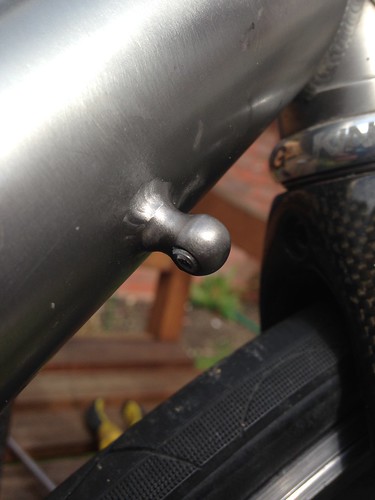
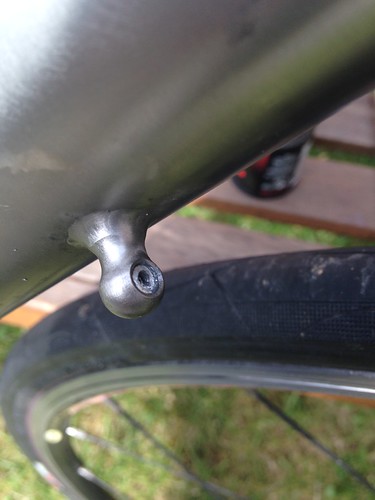
I have a titanium bike with external downtube barrel adjusters for the gear cables.
They haven't been fiddled with - (hate fiddling with gears, never needed to get involved.)
Anyway, the right side was very stiff. After spraying WD-40 a few soaks over 24hr, I wrapped a cloth around it and gently gripped and turned with some pliers. It snapped off. A few more soaks and I tried the lower threaded end. It also broke off with about 5Nm of torque applied (not much force at all...)
The result is the following...
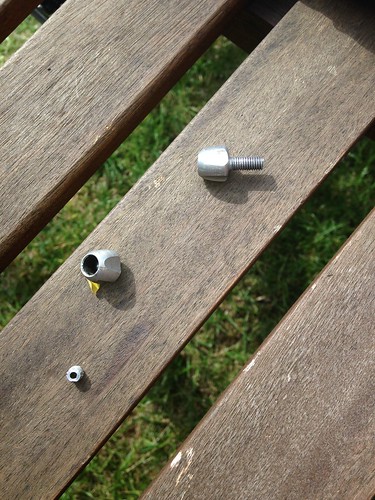
I tried to screw a wood screw into it in the hope it would grip and force it's new aluminium sleeve to turn within the titanium, but the screw only served to push outwards and probably increase the friction between the alu and ti.
I don't want to have to have another barrel adjuster mount rewelded in ti. Any solutions?
Thanks
I have a titanium bike with external downtube barrel adjusters for the gear cables.
They haven't been fiddled with - (hate fiddling with gears, never needed to get involved.)
Anyway, the right side was very stiff. After spraying WD-40 a few soaks over 24hr, I wrapped a cloth around it and gently gripped and turned with some pliers. It snapped off. A few more soaks and I tried the lower threaded end. It also broke off with about 5Nm of torque applied (not much force at all...)
The result is the following...
I tried to screw a wood screw into it in the hope it would grip and force it's new aluminium sleeve to turn within the titanium, but the screw only served to push outwards and probably increase the friction between the alu and ti.
I don't want to have to have another barrel adjuster mount rewelded in ti. Any solutions?
Thanks
0
Comments
-
I guess this is one of those jobs you wish you had never started ?
Options are :
Drill it out, apply heat and turn it out, take to LBS.He is not the messiah, he is a very naughty boy !!0 -
Looks to me like drilling out is the way forward. If it were me, I would see if you know anyone with previous experience of drilling out such things. An automotive engineer who is a mate of mine did it for me on a (car) brake caliper bracket with perfect results but I wouldn't have had the confidence to do it myself. The technique involved drilling multiple times with drill bits of increasingly large sizes in small increments to a point where the remaining screw thread "collapsed". I guess the idea is that you get to the point where it is the just the remaining thread of the screw that is left in the thread of the lug probably taking a very small amount of the lug thread off whilst drilling.
As I said, not something I would be confident about doing myself and getting "square" access to that lug with a drill could be tricky.
Best of luck.Wilier Izoard XP0 -
Couple of days soaking with Plus-Gas and maybe get it hot with a heat gun or boiling water, then you need a screw extractor bit. No faffing with drills; it already has a hole down the middle.
Hardest thing with these is getting access to them with the tools because they are so close to the downtube.0 -
Hi guys, **problem fixed**
Thanks so much for the really helpful tips. I mixed and matched from each of your comments. Getting straight access to the hole proved the biggest complication.
My saving grace was the hardness of titanium versus the soft aluminium. Drilled out then bore the hole with a screw driver. Finishing with just loose threads. I used a thin brass screw to rasp away the remaining aluminium pieces. The hard titanium didn't even flinch. Use the sharp end to scrape away the first 2 or 3 complete 360 degree turns of thread.
**If this were a steel frame, or aluminium, I would have been stuff I reckon**
My housemate found a very similar bolt (tiny bit of play, of poor rough quality - perfect to rasp away the remaining bonded AL2O3). Be careful not to cross thread here!!!
Be patient, take your time. Don't force it too much. If it creaks loudly, take it back.
I then screwed a hardened steel bicycle rack bolt. This was fairly stiff at first, but with a bit of WD-40 I winkled it back and forth progressively through until it went all the way through. Then I used toothpaste (microabrasion) to clear out the remaining ali oxide. Good as new!
Once through, I turned the drill bit by hand for the sake of gentleness. Because the bolt was hollow, it guided the drill bit through the middle initially. Then I used the drill bit in its sleeve to manually bore the hole wider, until the titanium threads started to become visible.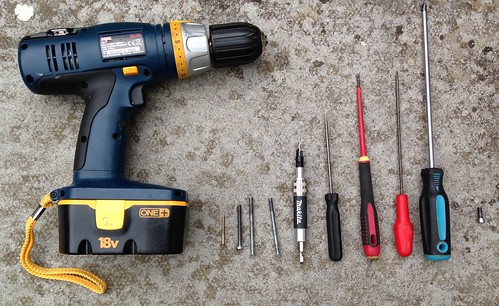


I am putting this info in case some other poor sod finds himself in my shoes.
*disclaimer* - this worked for me. As a one off, I may have got lucky. I cannot guarantee it will not wreck your bike, this is merely my journey through a horrid ordeal. Grease your nuts you dirty bastads! :oops:0 -
Result!!Wilier Izoard XP0
-
IF nothing else, this thread has made me go and apply some preventative medicine to my own Ti framed bike, added some grease to the adjusters.
My last Ti bike suffered the same fate as yours and I'm generally fastidious (but not enough, clearly) on bike maintenance.
Thanks OP 0
0 -
I have almost exactly the same issue and set up on my bike (even have the same headset ) but the barrel adjuster was stuck when I first got the frame (secondhand, never thought to check it) so if nothing else I won't be trying to force it without being prepared to go through all this! It all works perfectly fine without the barrel adjuster in fairness. 0
-
I have almost exactly the same issue and set up on my bike ...
Good luck mate. If you look around there are chemical alternatives you could try. Ammonia attacks ALi Oxide (which could be the problem). At least you have the advantage of knowing the potential outcome. I had no idea this would happen. Better get my headset services and regreased while I'm at it.. hope that's not got too cosy as well.. :shock:0 -
I have almost exactly the same issue and set up on my bike (even have the same headset ) but the barrel adjuster was stuck when I first got the frame (secondhand, never thought to check it) so if nothing else I won't be trying to force it without being prepared to go through all this! It all works perfectly fine without the barrel adjuster in fairness.
Yes essentially the downtube adjuster is only important for the front mech set up so if you cable your rear mech through the seized adjuster that would avoid the need to tackle the protracted process adopted by the OP. You can then use the free adjuster for your front mech.
I know it's a bit of a lazy cop-out but there's no guarantee that the OP's process would be successful in your case.0 -
well done0