Gearshift cable location problem on frame
Hi,
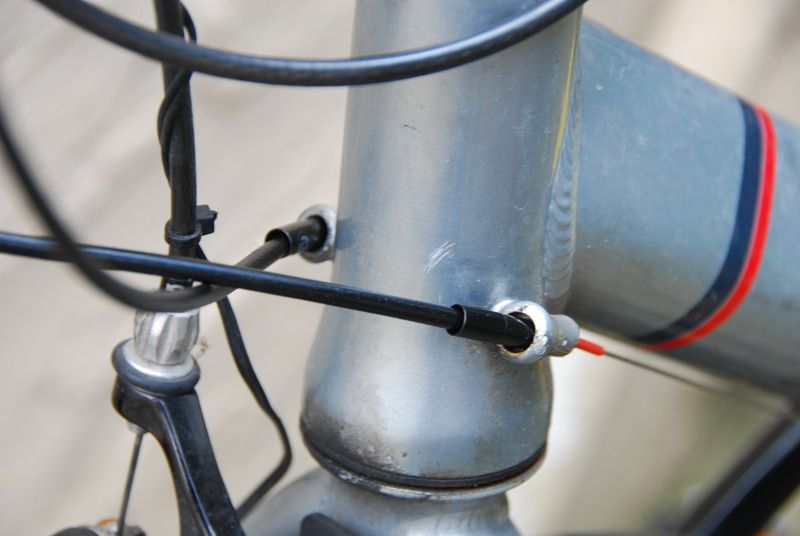
I have a Claud Butler Chinook bike which I bought second-hand a year or so ago. It works well, but the position of the gear shift cables on the frame at the front seems poor to me. The bobble that the outer sleeve sits in seems too far forward on the frame, which means the end of the sleeve gets thumped by the brake calliper when you turn one way, and tugged sideways when you turn the other way. This means that the end of the sleeve is prone to premature failure. Here are some photos showing the problem.
1. Straight ahead. You can see the sleeve is cracked and has failed, letting water into the inner cable.
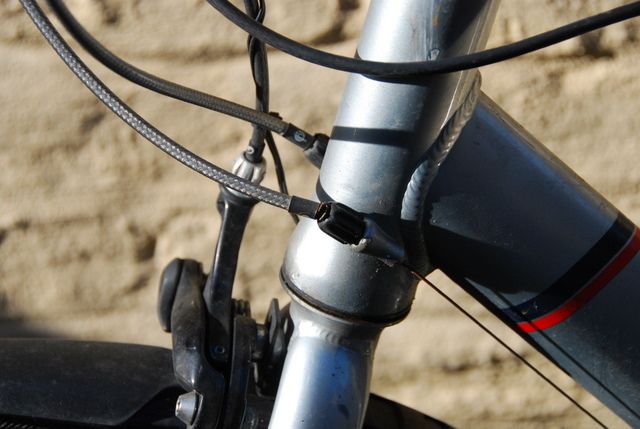
2. Steering hard left. The top of the front brake calliper catches on the cable and fatigues it.
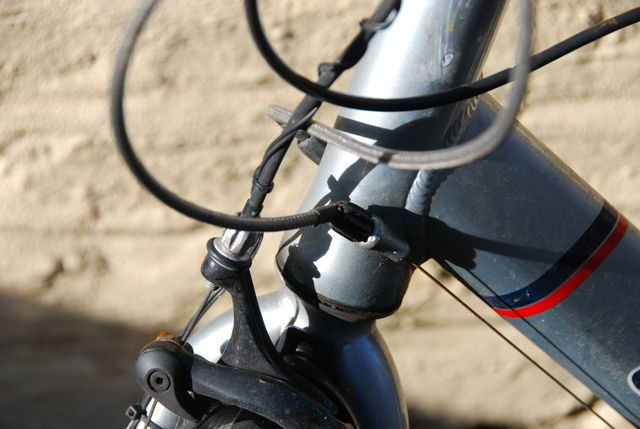
3. Steering hard right. Cable is tugged hard over to the right, fatiguing it in the other direction. The break is obvious.
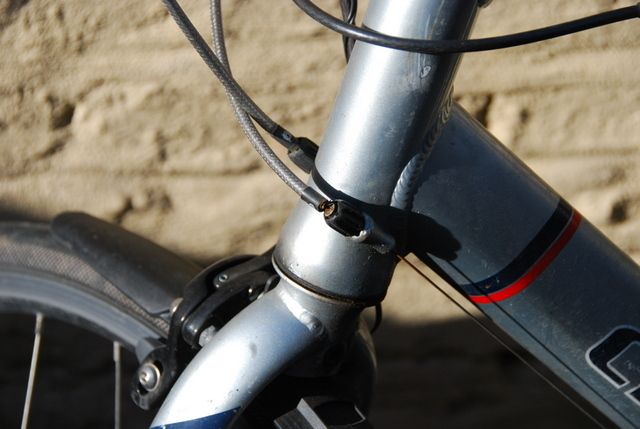
It's clearly a poor design - when I bought the bike the cable in this position was broken so I replaced it. This is what it looks like now, a year or so and 1500 miles later.
Replacing the cable isn't hard. Is there anything I can do to make sure this doesn't happen again? The proper solution would be to cut the bobble off the frame and weld it back on a bit further back, but this is getting a bit heavy and is rather more than I have the kit for at home. And it's aluminium, so welding it is trickier than it may be.
If anyone has any suggestions (clip-on bobble, perhaps? Or even simply running the cable sleeve all the way along the frame and holding it in place with cable ties - nasty as this sounds) then please let me know. I've googled the problem and can't find anyone else talking about it, which I find a little surprising given the design - unless I have done something wrong.
Thanks,
Oli.
I have a Claud Butler Chinook bike which I bought second-hand a year or so ago. It works well, but the position of the gear shift cables on the frame at the front seems poor to me. The bobble that the outer sleeve sits in seems too far forward on the frame, which means the end of the sleeve gets thumped by the brake calliper when you turn one way, and tugged sideways when you turn the other way. This means that the end of the sleeve is prone to premature failure. Here are some photos showing the problem.
1. Straight ahead. You can see the sleeve is cracked and has failed, letting water into the inner cable.

2. Steering hard left. The top of the front brake calliper catches on the cable and fatigues it.

3. Steering hard right. Cable is tugged hard over to the right, fatiguing it in the other direction. The break is obvious.

It's clearly a poor design - when I bought the bike the cable in this position was broken so I replaced it. This is what it looks like now, a year or so and 1500 miles later.
Replacing the cable isn't hard. Is there anything I can do to make sure this doesn't happen again? The proper solution would be to cut the bobble off the frame and weld it back on a bit further back, but this is getting a bit heavy and is rather more than I have the kit for at home. And it's aluminium, so welding it is trickier than it may be.
If anyone has any suggestions (clip-on bobble, perhaps? Or even simply running the cable sleeve all the way along the frame and holding it in place with cable ties - nasty as this sounds) then please let me know. I've googled the problem and can't find anyone else talking about it, which I find a little surprising given the design - unless I have done something wrong.
Thanks,
Oli.
0
Comments
-
Minor update: It seems that something like this may solve my problem (assuming that the design is poor rather than that I have installed the cables wrongly, which is always possible):
The problem is that this is designed for a round tube, and I can't find anything like this ('clamp cable stop') for an oval tube - which is what I would need. Does such a thing exist?
Thanks for any help.
Oli.0 -
That's pretty standard on a lot of externally cabled frames. I've always just routed the gear cable through the inside of the front brake cable eliminating any issues with it tugging. Although I'm not sure you should have your bars at that angle on the road anyway!0
-
Can you show the bike from the front? That's a pretty normal place to have the cable guides so maybe there's a way of routing the cables which would avoid the problem.0
-
The bobble as you call it is the headtube mouted cable stop and there is nothing wrong with the position. I think your problem is outer cable length is too short and the cable tension adjusters fitted into the cable stops is exacerbating the situation. You could remove them and use jagwire inline adjusters instead.
http://jagwire.com/products/v/Inline_Adjusters0 -
A lot of frames have the stops on the headtube now most bikes have STI levers on the bars. You could try shorter gear outers so they drop at a steeper angle into the cable stops.I've added a signature to prove it is still possible.0
-
Chaps,
Many thanks for your replies. I'm reassured that the bike should be OK, and that it sounds like I've installed the cables badly. Yes, reassured by my own lack of competence .... :oops:
Here's some more pictures of the current arrangement.
1. From front, showing how the four cables seem to want to occupy a fairly tight space.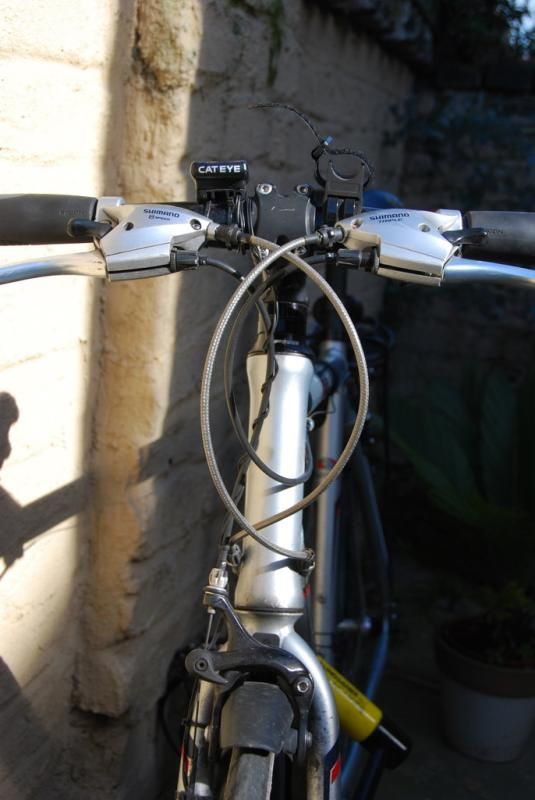
2. Another, taken slightly to one side.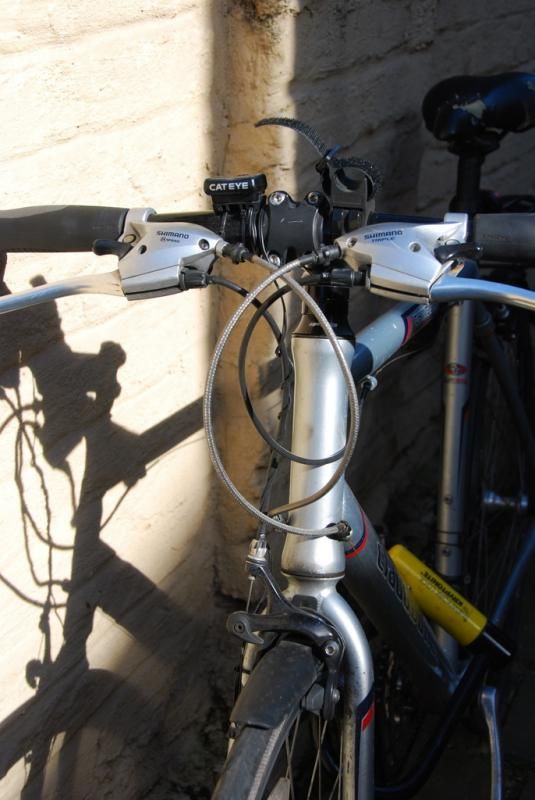
3. Steering fairly hard to the right (although within the limits of what would be expected when riding slowly in town).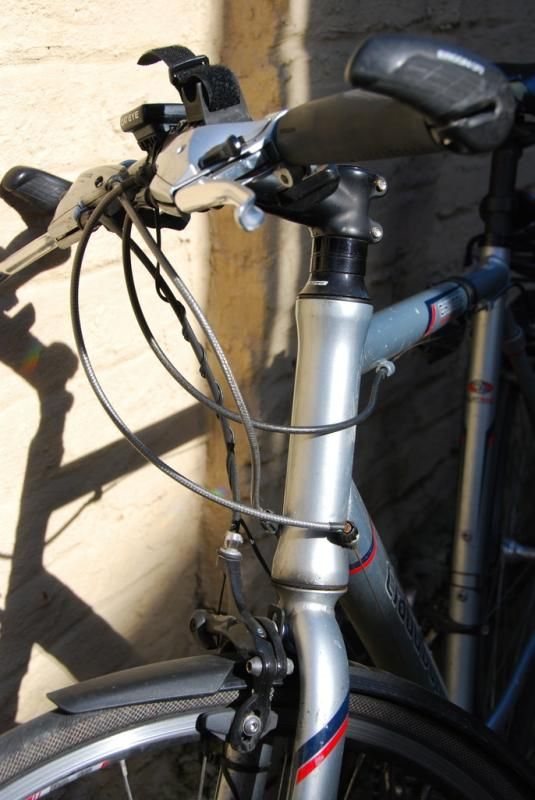
4. Steering hard to the left, showing how close the brake calliper gets to the cable stop.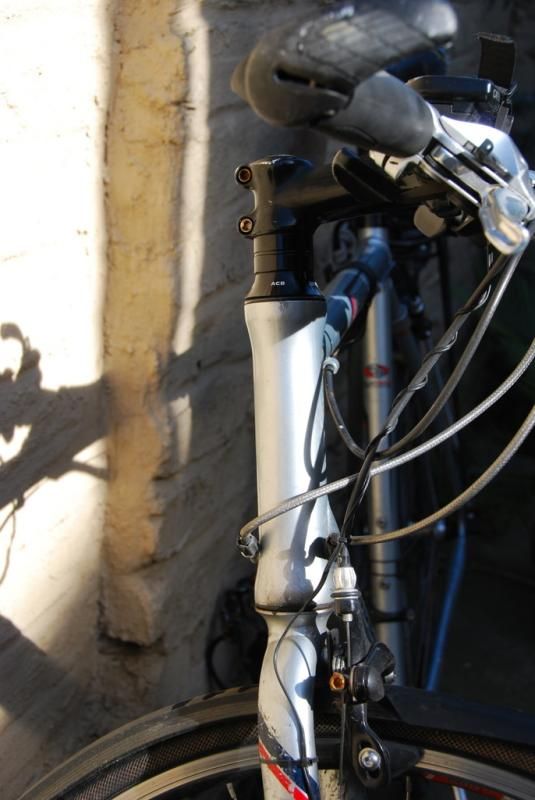
I'd be very happy to hear any suggestions of how the situation could be improved - both in terms of routing the cables and how long to cut them. I can see that if the front dérailleur cable outer (i.e. the one on the right hand side of the bike when viewed from the front, which has broken) was longer it may stop it pulling quite such an acute angle when steering to the right but it wouldn't help the problem with the interference with the calliper.
DJ58 - I'm with you in thinking that that the tension adjusters are part of the problem rather than part of the solution. How do the inline adjusters work?
Thanks again for your help.
Oli.0 -
The layout looks fine to me but the shifter outer could be slightly longer. You wouldn't be normally making that sharp turn when riding anyway. You got plenty of barrel adjusters there so inline cable adjusters arnt needed.0
-
Oli,
Your outer cables are a bit too short that is why they are being strained as you go from extreme lock to lock, though in normal riding you would not get to those limits. Your combined STI shifters/brakes already have cable tension adjust fitted, the black barrel that the outer/inner cable fits into, so you do not need the second set of adjusters that are fitted into the cable stops on the head tube. You do not need the Jagwire in-line adjusters either.
Buy some new gear outer/inner cables and end caps and re-make your gear cables, Trial fit with just the outer's fitted into the stops on the shifters and rest the other end against head tube stop to gauge the correct length, before you cut them, measure twice, cut once. What you want is a nice smooth radius curve from the shifter to the head tube, long enough that they are not strained on lock to lock, though not overly long either.0 -
Route the cables into the opposing frame stops, i.e. the left shifter into the stop on the right side and vice versa. Then cross the cables back over beneath the down tube.
As others have said, ditch the inline adjusters and add some length when you cut the new outer housings.- - - - - - - - - -
On Strava.{/url}0 -
+1 to crossing the cables and making them a bit longer. And definitely get rid of the barrel adjusters on the head tube, they're totally unnecessary.0
-
Chaps,
Update on this thread - with apologies for leaving it so long.
I fitted new cables and new cable outers and took the adjusters off the frame. I made the outers longer and put lots of oil down them to help the shifting. It now looks like this;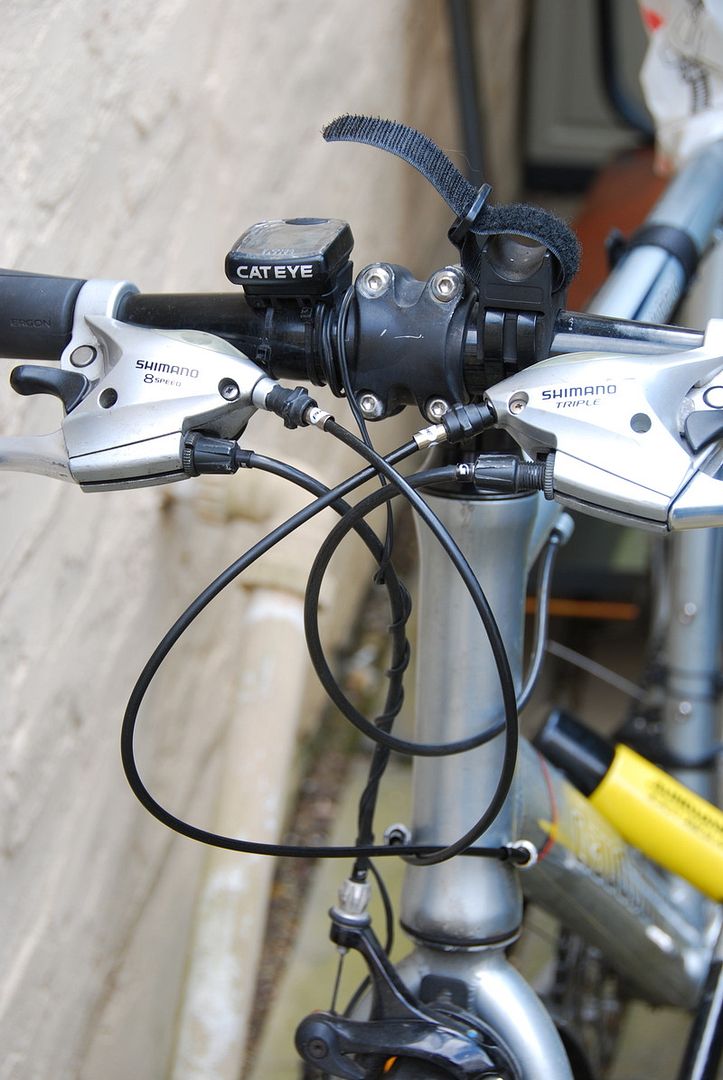
I didn't cross the cables over, as suggested, as I was slightly worried about them fretting against each other when they crossed back, further down the frame. Thanks for the suggestion none the less.
And the result? It's much, much easier to change gear! The thumbshifters work with a feeling akin to a knife cutting through warm butter and every gear is found, effortlessly and reliably, every time. It's hugely much better. It's better than I remember it being when I built the bike, 18 months ago. Of course, the true test will be what it's like in 18 months time, but it's all good thus far.
Thanks for your help.
Oli.0 -
cool.
just a small note - are those gear cable or brake cable ferrules? as they seem a little large for the gear cable outer (gear cable ferrules are a little narrower)
i cross my cables with no issues but what you have done there looks good0 -
dgunthor wrote:just a small note - are those gear cable or brake cable ferrules? as they seem a little large for the gear cable outer (gear cable ferrules are a little narrower)
Good Q - I hadn't considered it (I just used them as they were knocking around in my workshop), but having had a look I suspect you may be right.
Are there any issues with using brake ferrules where I should be using gear ferrules? (Other than that they are a bit big and everyone will laugh at me?) I'm hoping not.
Oli.0 -
Oli, that was my thinking when I saw the photo of your new cables, larger brake cable ferrules with gear cable outers. The cables won't be as well supported as they should be, you may get fretting on the outers and a build up of moisture and detritus in them over time, so keep your eye on them.0
-
i'd consider switching them - see if the ferrules seat correctly in the frame - the brake ones are wider so may not be seated well, if so i'd switch them.
if not, i'd put a little black electrical tape to cover the gap and keep rain/grime out0

