Tesco Terrain Ridge 26" Rigid Adult Mountain Bike
boryc
Posts: 7
I've recently - well my other half has recently had a bike to start riding. She had a rear puncture which I had the job of fixing. My knowledge of bikes is very basic. But I managed with some advice from the good people on here to sort the repairs out.
My trouble is now I've got to replace the wheel on the bike and I'm struggling to put the bike together again. The wheel derailleur I think it may be called - I cant see how this connects to the bike. I have a screw where I cant see where it goes.
This is how it should look with a image from the website and a arrow to the problem screw.

But when Ive got to put the part on the bike you can see from this image theres no where to put the screw;

just like a washer to fit in; but its like how on earth did it even go there originally......
Any help would be grateful; or if anyone has this bike or similar who could take a couple of pics to help
My trouble is now I've got to replace the wheel on the bike and I'm struggling to put the bike together again. The wheel derailleur I think it may be called - I cant see how this connects to the bike. I have a screw where I cant see where it goes.
This is how it should look with a image from the website and a arrow to the problem screw.

But when Ive got to put the part on the bike you can see from this image theres no where to put the screw;

just like a washer to fit in; but its like how on earth did it even go there originally......
Any help would be grateful; or if anyone has this bike or similar who could take a couple of pics to help
0
Comments
-
What does the back of the bracket look like (ie the bit behind the screw)?
Does the bottom of the screw stick out?
Think there should be a horseshoe shaped nut, the derailleur should be in place before you put the wheel on.0 -
It sits behind in the drop out.0
-
Put the clamp over the axle, tighten everything up, then tighten up that little bolt - in theory it staops the mech moving around the axle - works like a grub screw.I don't do smileys.
There is no secret ingredient - Kung Fu Panda
London Calling on Facebook
Parktools0 -
The screw sticks out of the back of the derailler mount and sits in the slot the wheel axle is sitting in to stop the derailler twisting. Put the nut on the axle a few turns then slide the derailler between the nut and the frame, push the wheel forward a bit till the screw can fit into the slot, then push the wheel back till its all solid and do up the axle nuts making sure the wheel is straight and doesnt try to work its way forward.Fig rolls: proof that god loves cyclists and that she wants us to do another lap0
-
That's a three minute fix for experienced hands.

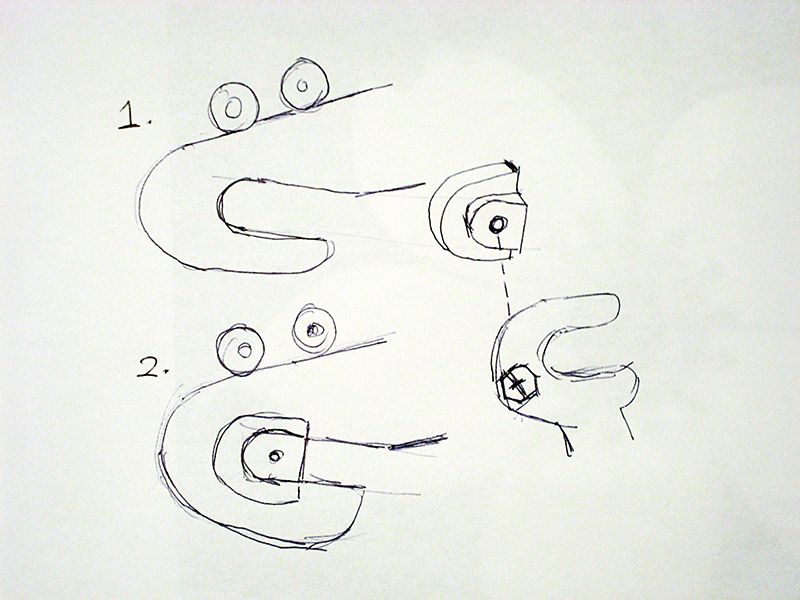
Hopefully, OP, you can deduce from this rough drawing how the derailleur is kept in place whilst you insert the wheel into the slotted dropouts.
Here is the easy way to fix the problem:
1. Turn the bike upside down, becareful not to scratch anything on the handlebars.
2. Shift into the smallest chainring and the smallest rear cog then drop the chain onto the inside of the frame (so that it is not sitting on the chainring). The purpose of this is to add slack to the chain so that you can work on the RD and insert the wheel.
3. Clamp the RD hanger onto the driveside slotted dropout - see picture.
4. Make sure that the axle nuts are partly screwed onto the wheel axle.
5. Whilst facing the non driveside, insert the wheel into the slotted dropouts. Bang it home with the side of your fist, this ensures that the axle goes all the way into the slots.
6. Grip the tyre between your forefinger and thumb of your left hand then roll the wheel slightly so that your finger and thumb gets trapped inbetween the chainstays nearest the bottom bracket. They will act like spacers and keep the wheel central whilst you tighten the axle nuts with your right hand.
7. Whilst maintaining a slight pushing force (into the slots) with the left, tighten the nuts with the right.
8. Mount the chain back onto the chainring (and rear smallest cog if not already done), pull the derailleur cage towards the bottom bracket to add slack if necssary.
9. Spin the cranks to test that the wheel is working as expected.0 -
Thanks for the reponses guys; I shall hopefuly sort it later then with all the advice! Thanks!0
-
Thanks guys - specially bikaholic for the drawing, that was helpful, think its all fixed, gonna take it for a test in a bit but seems all ok
 0
0 -
Once the small bolt holding the derailleur is in place, it doesn't need to be undone to remove the wheel, it just stays in place.Currently riding a Whyte T130C, X0 drivetrain, Magura Trail brakes converted to mixed wheel size (homebuilt wheels) with 140mm Fox 34 Rhythm and RP23 suspension. 12.2Kg.0

