Mechanical Disc Brakes - Not working / No bite

gt-arrowhead
Posts: 2,507
Ive tried fitting my disc brakes today, and its my first time doing it (probably the reason why its not going as planned..lol) and ive got it all fitted but when i pull the lever the lever is coming back all the way to the bar...and the pads aren't even touching the disc.
After a bit of adjusting i managed to get the pads to make contact with the disc, but i have almost no power, and its making a sort of continuous scraping noise, as if its barely touching. I have re tightened the brake cable several times to make sure it is as taught as possible to no avail. I have used the barrel adjustments on the lever and caliper to try and gain some bite but nothing is happening.
The other thing ive done is loosen the caliper from the adaptor and pushed it forward as far as possible to allow the pad that does the moving to come closer to the disc, then re tighten, while at the same time screwing in the other pad to come as close to the disc as possible without touching.
I have tried tightening the cable to the caliper in such a way where that the "arm" of the caliper, (the bit on the caliper that is pulled when you pull the brake) isnt fully loose, but is pulled slightly without touching the brake. I did this to try and stop the lever from going to the bar, and try and get more bite by having the pad closer to the disc when the brake isnt applied. Still no luck. It is frustrating...
Me and my dad both think that new pads will sort this problem out, eventhough the pads do seem to have a bit of life left in them. But then again thats just a guess, as it is my first time having a look at disc brakes. But i dont want to go and buy pads if it is not going to solve anything.
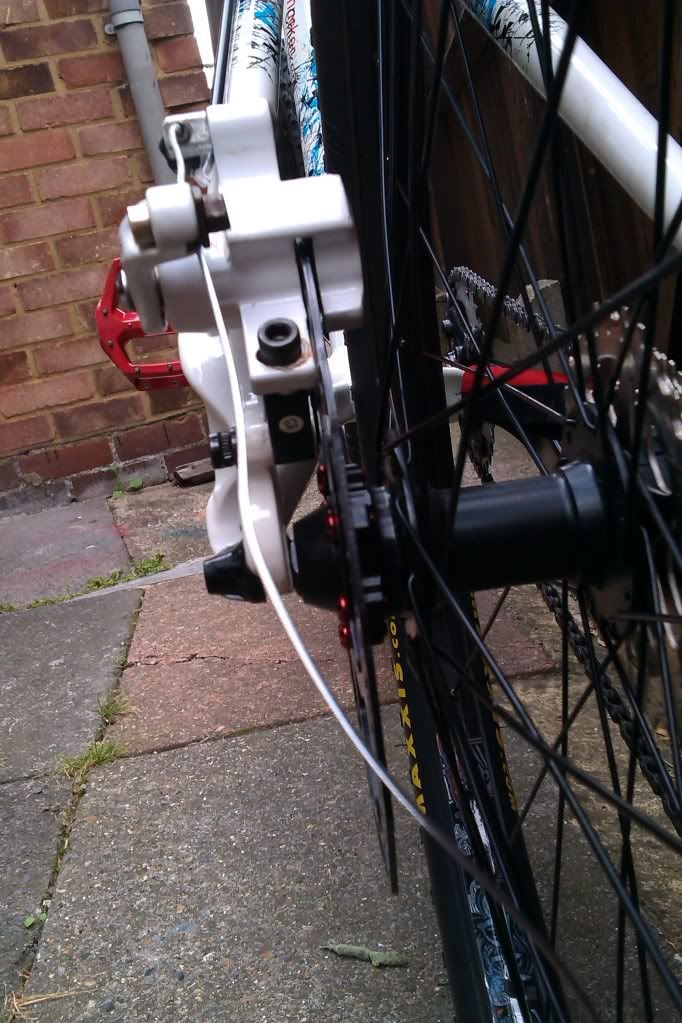
The disc is this: http://www.ebay.co.uk/itm/BARADINE-Cycl ... 35c61fe79b in 180mm, and the caliper is a clarks one, not sure of the model but i think it may be "skeletal?" The brake is on the rear.
On a side note, the pads have made a slight mark on the disc from where it has made a bit of contact and it seems that the pads are only making contact with half of the disc anyway, which is also worrying.
Thanks for the help in advance.
After a bit of adjusting i managed to get the pads to make contact with the disc, but i have almost no power, and its making a sort of continuous scraping noise, as if its barely touching. I have re tightened the brake cable several times to make sure it is as taught as possible to no avail. I have used the barrel adjustments on the lever and caliper to try and gain some bite but nothing is happening.
The other thing ive done is loosen the caliper from the adaptor and pushed it forward as far as possible to allow the pad that does the moving to come closer to the disc, then re tighten, while at the same time screwing in the other pad to come as close to the disc as possible without touching.
I have tried tightening the cable to the caliper in such a way where that the "arm" of the caliper, (the bit on the caliper that is pulled when you pull the brake) isnt fully loose, but is pulled slightly without touching the brake. I did this to try and stop the lever from going to the bar, and try and get more bite by having the pad closer to the disc when the brake isnt applied. Still no luck. It is frustrating...
Me and my dad both think that new pads will sort this problem out, eventhough the pads do seem to have a bit of life left in them. But then again thats just a guess, as it is my first time having a look at disc brakes. But i dont want to go and buy pads if it is not going to solve anything.
The disc is this: http://www.ebay.co.uk/itm/BARADINE-Cycl ... 35c61fe79b in 180mm, and the caliper is a clarks one, not sure of the model but i think it may be "skeletal?" The brake is on the rear.
On a side note, the pads have made a slight mark on the disc from where it has made a bit of contact and it seems that the pads are only making contact with half of the disc anyway, which is also worrying.
Thanks for the help in advance.
0
Comments
-
Well the clack skeletal brakes are Hydros.
So before going any further I'd exactly wat the brake is and then get the manual and read it.
Or correctly ID it and then some one can retype the manual for you."Do not follow where the path may lead, Go instead where there is no path, and Leave a Trail."
Parktools :?:SheldonBrown0 -
I have looked on the clarks website, and i have found out that it is a CMD - 8. The only thing on their website is fitting instructions and technical specs. I have fitted them how they say they should be fitted...
They dont really tell you what you should do when you encounter a problem. The only thing it says on there is to advance the pad as it wears out.0 -
Is it the one I sold you? The pads were on the way out, could well be that.0
-
Yep it is. I think im going to just buy new ones, cant see why that wont solve the problem.
Thanks0 -
Is it one of these...

If you've got the right size rotor and adaptor then the rotor should be quite close to the top of the aperture in the caliper....
Setup is fairly simple. Before doing the cable, simply unscrew the two top screws (the top ones on the caliper itself, not the ones that hold the adaptor to the frame) and push the lever forward till it's clamped on the rotor. Try and alter the inside adjuster so that the clamping position is near the center of the aperture of the caliper and the rotor isn't sitting too close to one side or the other.
With the lever still pressed forward, gently tighten up each of those two top screws incrementally (don't want to twist the caliper as your tightening the screws or it wont be faced correctly with the rotor afterwards). Now let go of the lever and spin the wheel. The moving pad shouldn't now be anywhere near the rotor but the fixed pad should.. and will probably be rubbing against the rotor, making some noise.
Back the static pad away from the disk rotor slightly until the rub stops (how close you can keep the pad to the disk plays a significant part of how well a mechanical brake will perform). Now it's simply a case of pulling the cable tight through the caliper lever until all slack is gone, tightening the cable clamps and getting the tension such that the arm makes the moving pad contact the rotor quite early on when you pull the brake lever. I often pull the caliper arm half way forward and pull the cable tight and clamp it in that position, so that the moving pad isn't very far away from the rotor.
It's also worth mentioning that cabling can have a affect on braking too. I use jagwire cables as Shimano cables tend to be too spongy and absorb some of the tension being applied to the lever. Which is why it's not a good idea to run a full outer cable from the handle bars all the way to the caliper (use the frame stops if your frame as them). Also, you want the cable as straight as possible, with as few curves in it as possible. If you see the cable twitching too much when you pull the levers, some of the force being applied to the lever is lost in outer cable compression and inner cable flex before it even reaches the brake caliper. Rotor flex is the other main sapper of force, hence the reason i mentioned it's best to have the static pad and disk rotor as close as possible (the further away it gets the more force is diverted into simply bending the rotor, so that less gets turned into actual clamping force... aka, you have to pull the levers a lot harder).
And remember that you wont get much braking until you've bedded in the rotors. Usually by doing a lot of quick sharp jerky stops until some of the pad material as coated the rotor.0 -
Wow! Thanks for that Answer!
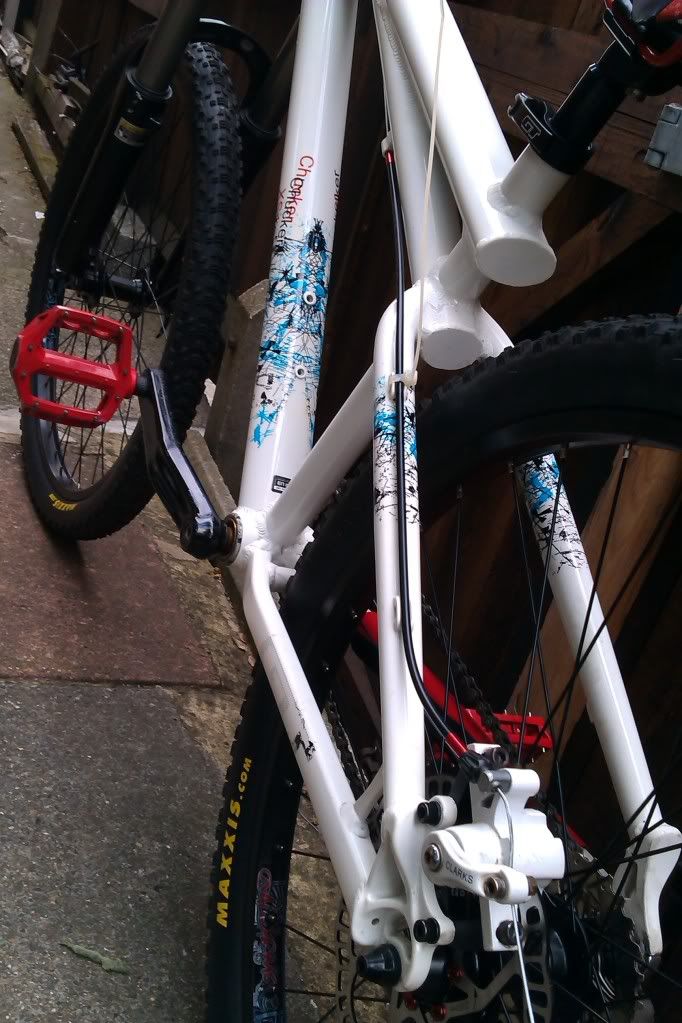
I will go and get some photos of my routing as i could potentially have done it slightly wrong on the rear half of the bike. I am using the frame stops and im sure the lengths of outer cable are fine. The inner is brand new and the outer is also brand new, and is Clarks outer cabling. Ill refit it again in the way that you said and get some photos if i still have no luck. By the way, the cable is slack in the photos because it isnt tightened up, its just threaded into the caliper at the moment.Ouija wrote:I often pull the caliper arm half way forward and pull the cable tight and clamp it in that position, so that the moving pad isn't very far away from the rotor.
I have tried this thinking i was smart, but still nothing thats when i came to the conclusion that it was worn pads. 0
 -
I tried what you said about having the lever pulled and tightening the caliper mounting bolts but when i do that the the caliper is touching the disc
 So i just moved it as close as possible...which is what i did before, and i did the same by screwing in the other pad as close as possible. Still the same, no power. I got some photos of the cable routing. From what i can tell its all correct...im going to get new pads i think!
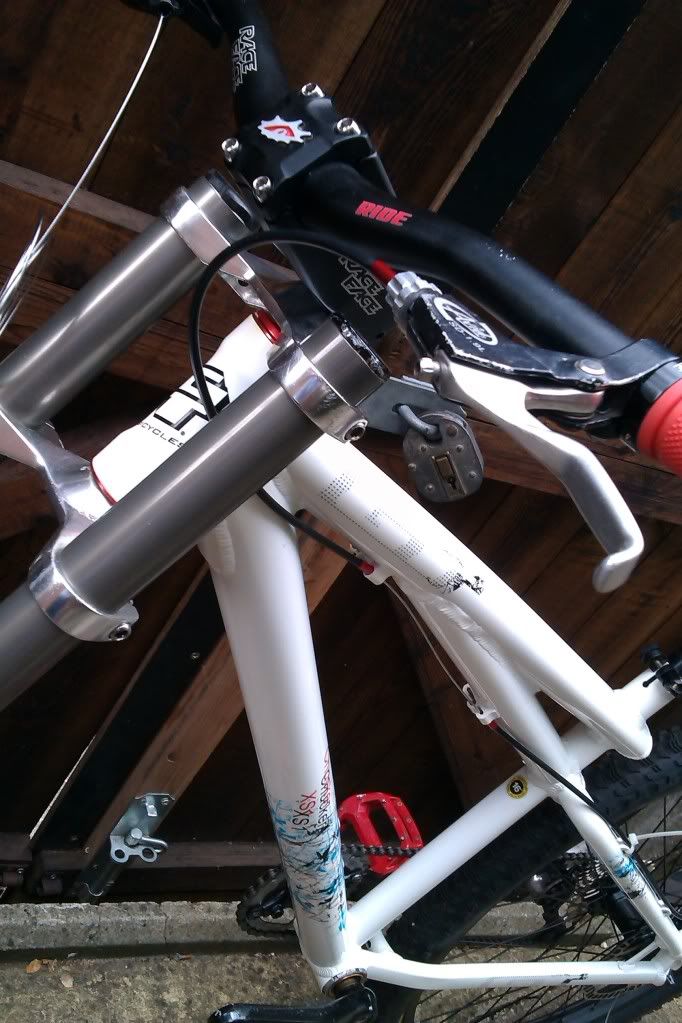
 0
0 -
The whole idea behind pushing the lever forward and screwing the static pad in at the same time is not only to get the disk centered but to actually see that you can get the two pads clamping the rotor so that the caliper can't move from side to side. It also aligns the top and bottom of the caliper for perfect facing of the pads to the disk. Simply aligning by eye won't do that.
If you did push the lever forward and clamped the rotor in the center of the calipers slot and the calipers aperture slot is slanted at an angle so that one end of the slot is touching the rotor it means the pads aren't flat any more (they've been worn down at a sloped angle) and probably need replacing. Because it's always the pads you face vertically to the rotor, not the caliper.
Aligning the caliper slot so that it's parallel to the rotor when the pads are worn and sloped would mean that only a tiny fraction of the pad is actually touching the rotor (the thickest part of their sloped edges) giving very little braking.
And judging by that third pic you've probably got way too much outer cable going to the caliper. Either cut it so that it's almost perfectly straight from the cable stop or tie down that second section so that it can't move about so much. Remember. If you can see the outer cable twitching your losing some clamping pressure from the brakes.
Only after the outer cable as compressed as much as it can and the inner cable has snapped tight, taking the straightest line possible, does any extra pressure applied to the brake lever actually start getting applied to the caliper lever. If you feel the pads touching the rotor quite early on when pulling the brake lever but no braking takes place until you've got the lever all the way back to the handlebar it's due to inner/outer cable flex and rotor flex soaking up most of the pressure being applied (which is why hydraulics tend to be better in this area, as they use a non-compressible liquid and have both pads move towards the rotor, instead of one remaining stationary, requiring the rotor to be flexed).
A mechanical caliper can clamp just as hard as a hydraulic one, what prevents it from doing so is inner/outer cable flex and rotor flex sapping energy away, so keep cables as minimal as possible and the static caliper pad as close to the rotor as humanly possible.0 -
Thanks again for the detailed answer, the problem in the end was the brake pads. I got new ones from halfords today and they were alot thicker than the old ones i had before. I got them fitted then i did what i tried last time, which was applying the brakes and tightening the caliper bolts. This time the caliper wasnt rubbing against the disc. The reason it was rubbing last time is because the pads were so badly worn that the caliper was touching the disc before the pad.
When i did tighten the caliper bolts this time with the new pads there was alot of rubbing going on between the pad on the outside (the moving one) and the disc, so i did by eye again. It was still rubbing slightly but after a few trips up and down the road the rubbing stopped, and i have been riding the bike for about an hour and a half today. The power from the brakes has improved and i can lock the rear wheel if i squeeze it hard enough, so thats pretty good. I would like it to be a bit stronger though, as i have to pull quite hard to get the power that i want. How long does it usually take for the brakes to bed in?
The brakes are also making a faint sort of grinding/rubbing noise when i apply the brakes. Is this normal? Will that go after a bit more bedding in?
But all in all the brake issue is sorted, but not 100%.
Thanks!
I need to get myself a cable tie to go on that part as it moves slightly when the brake is applied. If i have the cable any shorter it wont go into the caliper. I could probably only take a mm or so off at the most.0 -
As mentioned, the best way to bed a rotor is short violent breaking, rather than gentle rubbing when coming to a stop or being used as a gentle drag brake going down hills. Shouldn't take more than a few jabs to do it. It's also worth mentioning that rear brakes are never as powerful as front brakes. My rear mechanicals tend to be more for dragging but it's usually the front ones that dive the forks and practically throw you over the handlebars.
As for the cable length thing, you might be surprised to learn that i actually cut the outer cable a millimetre short (so that i can actually slide it up and down the inner slightly) and then just wind out the adjuster on the back of the caliper until it lightly kisses the outer cable. This stops the outer from compressing or bending the inner cable (the outers only there to protect the inner from rusting, there's no need for it to be longer than needs be, bending the inner cable so that it flexes as this can make the brake levers feel a bit soft and 'spongy'). I actually run mine in a straight line.
(the opening for the cable on the Clarks actually swivels so it can be aimed directly at a frame stop or cable tie point).0 -
The reason it was rubbing last time is because the pads were so badly worn that the caliper was touching the disc before the pad.
That's just poor set up. I didn't have any of these problems, albeit the pads were worn and would have needed repalcing sooner rather than later.0 -
I did alot of all sorts of braking today. I did violent braking (just not enough to lock) I did dragging, and i did a massive stop on the way home at the bottom of a big hill, from full speed pedaling down the hill to a stand still. I heard a continuous clank straight after when i started cycling off. (Thats just because of the heat isn't it? It went away after a minute or so). Would it be a good idea to cycle down a canal path for 2-3 miles to get some dust on them? I read that dust/grit improves braking power on disc brakes. Id helped bed in my V brakes when i went for a long ride on the canal path.
As for the setup and cable lengths, ive got new caliper and adaptor bolts on the way that i want to put on, so im going to fiddle around with it some more and keep trying it to get it perfect. I may try having a straight wire too, the reason i had it going down with the frame is because thats where the clamping points were, so i thought that would be the best place for the routing to go. I still have a bit too much slack on the wire aswell But the lever felt good with the ideal amount of travel so i left it. I sound like such a bodger now dont i?. :oops:
Supersonic, its probably because i didnt really know what i was doing, lol. I tried having the arm connected while pulled a bit, but the caliper was still touching the rotor first. Im going to watch a bunch of youtube videos and stuff and see how its done.
Thanks for putting up with my noobieness guys!0 -
Perfectly understand. You can do the cables any way you please. I simply find too much curvy cables and the levers feel spongy as they take up the inner/outer cable slack, so you end up with that feeling like no real brakings taking place till you've almost got the lever all the way to the bar (which some people like). Straight and tight cable tend to lead to a more instant snappier/jerkier feel.
If your sure their bedded in try adjusting your static/inside pad until it starts to rub against the rotor and see if that improves braking. Most people have to put up with rubbing noises the first few weeks of owning mechanicals (or back the pads out far enough to be quiet and live with the reduced performance). The pad will eventually wear itself in.0 -
I just spent a bit of time faffing around with the brakes again. I totally ruined it at first, i made it worse than before. Those calipers are right b*stards to do up alone arent they? You need an allen key, a spanner and a pair of pliers to pull with. I found the solution in the end. Hold the pliers and the spanner in such a way that you are pulling the wire with the pliers while holding the spanner in the same hand, then tighten up with the allen key.
In the end i shone i torch through the caliper to see the gap between the pad and rotor and moved the pad as close as possible to the rotor, until the gap where the light came through was very very thin. Then i got a sort of very stiff lever with a short amount of travel. I dont like it like that, so i used the barrell adjustments to slacken the wire and now it feels the way i want it to feel and is very strong. Sorted!!!
One last question...are they supposed to make a fair bit of noise? The noise only happens when the brake is applied.0 -
Discs might need a clean but otherwise just use them, the noises will always be there, but might go down if you burn something off.0
-
Just wind the adjuster in at the lever, do the clamp on the cable up tightish and then adjust with the adjuster on the lever - simples....Currently riding a Whyte T130C, X0 drivetrain, Magura Trail brakes converted to mixed wheel size (homebuilt wheels) with 140mm Fox 34 Rhythm and RP23 suspension. 12.2Kg.0
-
GT-Arrowhead wrote:
In the end i shone i torch through the caliper to see the gap between the pad and rotor and moved the pad as close as possible to the rotor, until the gap where the light came through was very very thin. Then i got a sort of very stiff lever with a short amount of travel. I dont like it like that, so i used the barrell adjustments to slacken the wire and now it feels the way i want it to feel and is very strong. Sorted!!!
.
Yeah, the larger the gap on the left hand side will affect the how far the brake lever has to be pulled before making contact with the rotor. The larger the gap on the right/inside will determine how well the brake performs (preferably no gap at all).
As for strange juddering noise (not squeel), that's determined by the type of rotor and the drill hole patterns. I use three different sets of wheels with three different sets of rotors on mine. The lightweight (full of holes and barely any material) rotors that came with the Clarks can be terribly rough sounding and juddery, the cheap Tektros and and expensive Hope rotors on my other wheel sets tend to be better (the hopes have the better stopping power).0 -
Thanks for the replies,
The gap is very almost non existent now, after my adjustments yesterday with the torch shining through etc. As for the noise ill just deal with it, its not really that much of a fuss to be honest, i can barely hear it when im cycling anyhow.0


