BMX photography
mrfmilo
Posts: 2,250
Comments
-
-
1st 3 are the best - all good though!
 Falcon Sierra - 80's
Muddy Fox Courier - 80's
GT Palomar 90's
GT Zaskar LE - 90's
Cannondale k v 900 90's
Santa Cruz Bullit - now
Orange Evo 8 STOLEN 26/09/10
Orange P7 Pro
Lots of kites.0 -
-
Isn't it was frowned upon to take pictures of kids in the park
 gochel chan ddynion i mewn blew beisiau achos hwy cadernid bod eirth0
 -
They all look awesome!Specialized FSR XC Expert 20100
-
Only when your hiding in the bushes with a lime/string and your hand on your obvious :shock:ol\'gregg wrote:Isn't it was frowned upon to take pictures of kids in the park 0
0 -
nice shots dude, good man 8)0
-
1, 3 and 4 are great. The rest are good.0
-
Some good ideas and well captured, I particularly like #1 and #4.
I know how annoying it is when people look at a one-off shot you're proud of and say 'Oh, you should have done this or that' - been there many times myself . . but as you asked for opinions, here are some suggestions (all IMHO - photography is very subjective) . . .
I've done a few very quick rough and ready edits to show you what I mean - these are lo-res .jpgs so there's a limit to how much latitude there is. The changes I've made would look much better done on the original hi-res images.
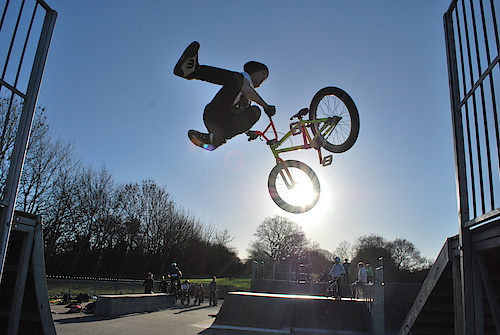
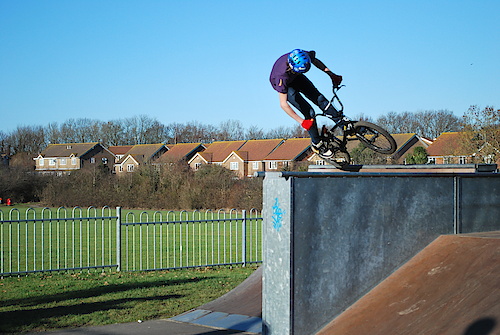
#1 - Brighten the dark areas of the rider to show some detail; crop out the distractions. For these backlit shots try using fill-in flash to avoid the hard shadows / silhouette effect
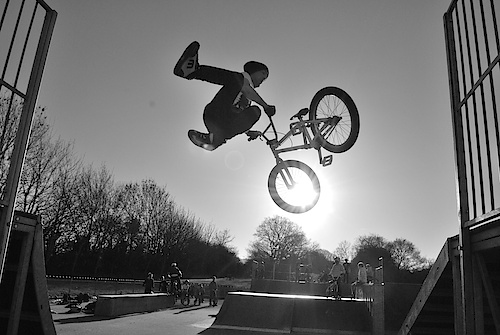
#2 - IMO mono does not work for this image.
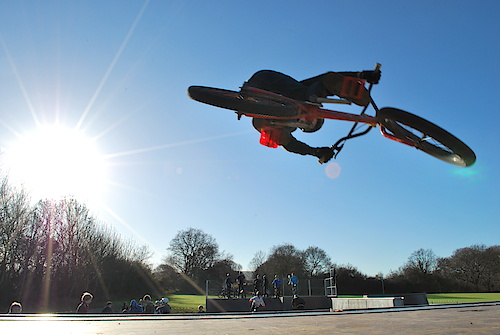
#3 - Exposure is good, and there's a good idea in the making but it needs some work: On this image, rotate slightly; clone out the bright reflection above and left of the rider (in the top left corner of the cropped area); and crop out distracting background. Personally I'd try doing a load of similar shots varying the angles, colours, light, etc and see what 'gels'
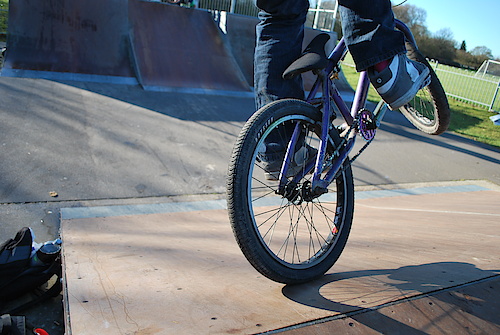
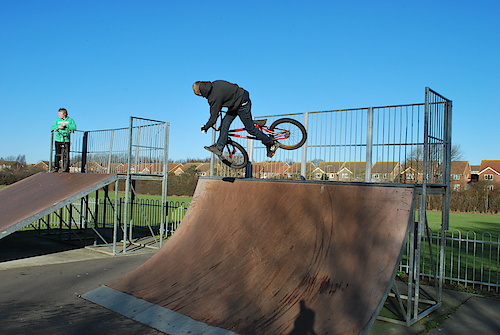
#4 - Brighten the dark areas of the rider & bike to show some detail; bump up the saturation of the rider & bike to improve colour; heal or clone out the lens flares; crop out the distractions. Again, fill-flash is your friend in these situations.
#5 and #6 - well exposed but the rider is
a) way too far away (prob even for rescue by cropping)
b) is mixed up with background stuff like roofs and railings.
try to get much closer, and use a wide aperture (f4 or wider) to get a shallow depth of field - that allows you to blur out the distant background but keep the rider in focus, which naturally keeps viewers' attention on the rider.
Generally, get in closer (if not by moving closer, then by zooming in) and keep the image simple by avoiding extraneous objects around the edges; try to leave something to the viewer's imagination; and don't lose the rider against the background.
Keep shooting . . My abundant supply of MTFU is reserved for use in dry, sunny conditions.0
 -
Delta5 wrote:Some good ideas and well captured, I particularly like #1 and #4.
I know how annoying it is when people look at a one-off shot you're proud of and say 'Oh, you should have done this or that' - been there many times myself . . but as you asked for opinions, here are some suggestions (all IMHO - photography is very subjective) . . .
I've done a few very quick rough and ready edits to show you what I mean - these are lo-res .jpgs so there's a limit to how much latitude there is. The changes I've made would look much better done on the original hi-res images.
#1 - Brighten the dark areas of the rider to show some detail; crop out the distractions. For these backlit shots try using fill-in flash to avoid the hard shadows / silhouette effect
#2 - IMO mono does not work for this image.
#3 - Exposure is good, and there's a good idea in the making but it needs some work: On this image, rotate slightly; clone out the bright reflection above and left of the rider (in the top left corner of the cropped area); and crop out distracting background. Personally I'd try doing a load of similar shots varying the angles, colours, light, etc and see what 'gels'
#4 - Brighten the dark areas of the rider & bike to show some detail; bump up the saturation of the rider & bike to improve colour; heal or clone out the lens flares; crop out the distractions. Again, fill-flash is your friend in these situations.
#5 and #6 - well exposed but the rider is
a) way too far away (prob even for rescue by cropping)
b) is mixed up with background stuff like roofs and railings.
try to get much closer, and use a wide aperture (f4 or wider) to get a shallow depth of field - that allows you to blur out the distant background but keep the rider in focus, which naturally keeps viewers' attention on the rider.
Generally, get in closer (if not by moving closer, then by zooming in) and keep the image simple by avoiding extraneous objects around the edges; try to leave something to the viewer's imagination; and don't lose the rider against the background.
Keep shooting . .
Wow cheers for that I only disagree on the first pic about the cropping, IMO i'd keep it full size so you can see he's transfered from the left quarter to the right one. Cheers again for the advice, this was my 2nd attempt at sports photography, so still quite noobish xD 0
 -
TBH, i didn't notice he'd transferred until i read it :?
it's still agood pic though 0
0 -
They all should get an asbo, bloody kids on bikes, hanging round parks drinking white lightning and listening to that bang bang music0
-
mrfmilo wrote:Wow cheers for that
 I only disagree on the first pic about the cropping, IMO i'd keep it full size so you can see he's transfered from the left quarter to the right one. Cheers again for the advice, this was my 2nd attempt at sports photography, so still quite noobish xD
I also disagree with the first pic and the cropping!
The two barriers actually act as a natural framing. In a similar sense to the way arches are often used in photographs of cities or trees/branches/leaves are used in landscape photography. e.g. http://s1.hubimg.com/u/963184_f520.jpg
Good work - keep it up!0 -
north-sure wrote:mrfmilo wrote:Wow cheers for that
 I only disagree on the first pic about the cropping, IMO i'd keep it full size so you can see he's transfered from the left quarter to the right one. Cheers again for the advice, this was my 2nd attempt at sports photography, so still quite noobish xD
I also disagree with the first pic and the cropping!
The two barriers actually act as a natural framing. In a similar sense to the way arches are often used in photographs of cities or trees/branches/leaves are used in landscape photography. e.g. http://s1.hubimg.com/u/963184_f520.jpg
I see what you both mean and agree to some extent. Perhaps if the railings were stronger / more curved over by use of a very wide angle lens, the 'arch' effect would work, but I didn't think the 'framing' was strong enough to carry it off in this particular image. Like most photos it could be cropped in several different ways - in the end its really comes down what you prefer. In the landscape example you linked, it works because the surrounding trees lead your eye to the peak, but the railings didn't do that for the rider & bike.
As it happens I cropped out the left railings because it seemed to balance the image better. With the left railings included my visual attention was divided too much - it drew my eye across the full width of the image, away from the main object (rider & bike) in two opposite directions, which (for me) detracted from the powerful image of the rider & bike in mid-air. It's also usually more pleasing to have an object entering / facing into a picture rather than leaving / facing out of it, so as he seemed to be heading to the right it made more sense to leave the right railing visible to provide a kind of contextual boundary.
This might be of interest: http://www.digicamhelp.com/taking-photos/advanced-techniques/composing-photos/
Keeping images simple increases their impact, so it helps to limit the number of 'centres of interest' or 'focal points' to as few as possible - preferably one, often two, maximum three, and try to position these at the 'intersections of thirds' rather than dead centre or way off to the edges. http://en.wikipedia.org/wiki/Rule_of_thirds
The R.o.T. can also be based on Fibonacci's golden ratio of 1:1.618 . . . http://www.digital-photography-school.com/divine-composition-with-fibonaccis-ratio-the-rule-of-thirds-on-steroids
That said the guidelines for composition are just that. There are always exceptions and you just have to do what works best in each situation. In sports / action photography one would be lucky to get it all right in camera - that's why the pro sports shooters often machine-gun the action and let their editors select one or two frames which are then cropped to get decent composition. In publications you only get to see the best of the best, maybe two or three images out of a thousand captured.
mrfmilo - Glad to help and thanks for sharing. Sports photography is one of the most demanding and challenging types of photography (after weddings!) and if this is only your 2nd attempt you're doing well - especially that first shot!My abundant supply of MTFU is reserved for use in dry, sunny conditions.0 -
Delta5 wrote:I see what you both mean and agree to some extent. Perhaps if the railings were stronger / more curved over by use of a very wide angle lens, the 'arch' effect would work, but I didn't think the 'framing' was strong enough to carry it off in this particular image. Like most photos it could be cropped in several different ways - in the end its really comes down what you prefer. In the landscape example you linked, it works because the surrounding trees lead your eye to the peak, but the railings didn't do that for the rider & bike.
As it happens I cropped out the left railings because it seemed to balance the image better. With the left railings included my visual attention was divided too much - it drew my eye across the full width of the image, away from the main object (rider & bike) in two opposite directions, which (for me) detracted from the powerful image of the rider & bike in mid-air. It's also usually more pleasing to have an object entering / facing into a picture rather than leaving / facing out of it, so as he seemed to be heading to the right it made more sense to leave the right railing visible to provide a kind of contextual boundary.
This might be of interest: http://www.digicamhelp.com/taking-photos/advanced-techniques/composing-photos/
I see where you coming from. I just saw it as the railings seem to give a sort of perspective. The angle the shot is taken at (to me at least) makes it seem as if the railings are drawing to a point - that "one-point perspective stuff" - which draws my eyes towards the rider.
But isn't that what art is about, subjectiveness, everybody can see something different in a photo/painting.0 -
Don't agree with that at all. The silhouetting is a nice natural touch, and the barriers frame it well.Delta5 wrote:#1 - Brighten the dark areas of the rider to show some detail; crop out the distractions. For these backlit shots try using fill-in flash to avoid the hard shadows / silhouette effect
I also don;t see the fuss with the lens flares. I actually like a nice accidental flare, as long as it's not obscuring any detail. There seems to be a strong movement to abolish all flaring in photography right now. Sometimes, it's inevitable, and is part of the moment, like a sweet fret buzz on a guitar, or hearing the felt dampers on a Steinway grand piano. It's not ideal to have it, but it's more organic to leave it alone if it's there.
Other than that, they're nice pics. Obviously they fail because they're not riding 29ers with 7 inches of rear suspension though.0 -
I'd agree if the sun was behind the rider . . . that could be awesome.yeehaamcgee wrote:The silhouetting is a nice natural touchI also don;t see the fuss with the lens flares. I actually like a nice accidental flare, as long as it's not obscuring any detail. There seems to be a strong movement to abolish all flaring in photography right now. Sometimes, it's inevitable, and is part of the moment, like a sweet fret buzz on a guitar, or hearing the felt dampers on a Steinway grand piano. It's not ideal to have it, but it's more organic to leave it alone if it's there.
Yes, sometimes flaring can work - though ime that's more often when its intentional and controlled than accidental. It can be elevated to an art form though - ever used a Holga? Agree about the value of natural flaws / the organic aesthetic, especially in music. It's what separates a live performance from an edited studio recording.My abundant supply of MTFU is reserved for use in dry, sunny conditions.0 -
I'd suggest just using normal flash first to get your head round exposures and stuff. Then once you have it down, use the strobe, and burst mode on the camera.
Of course, with such strong backlighting you may find that your flash's strobe setting might not produce enough light to overcome the shadows.
Mine only does about two flashes at full power, then it increases as you go down to 1/2, 1/4, etc etc.0 -
yeehaamcgee wrote:I'd suggest just using normal flash first to get your head round exposures and stuff. Then once you have it down, use the strobe, and burst mode on the camera.
Of course, with such strong backlighting you may find that your flash's strobe setting might not produce enough light to overcome the shadows.
Mine only does about two flashes at full power, then it increases as you go down to 1/2, 1/4, etc etc.
I'm already using the camera flash for some pics, I also had the big flash with me but the lighting was good enough without it. I might go down when it's getting darkish next and experiment with different flash positions 0
0 -
The big flash is what I mean. I've got a Sigma 530DG super, wich is a pretty damned powerful flash, but like I said, repeated fast flashes requires a lower output.0
-
yeehaamcgee wrote:The big flash is what I mean. I've got a Sigma 530DG super, wich is a pretty damned powerful flash, but like I said, repeated fast flashes requires a lower output.
Ah right, I meant the camera flash, and then the additional big flash.0 -
yeehaamcgee wrote:I also don;t see the fuss with the lens flares. I actually like a nice accidental flare, as long as it's not obscuring any detail. There seems to be a strong movement to abolish all flaring in photography right now.
is there anyway to remove lens flare once it has occurred or whats the best way to avoid it?
for example, i took this pic t'other day but didnt realise until i had downloaded it from the camera that there was a light flare on it.0 -
Avoiding lens flare is a case of making sure the lens is pointing away form direct sunlight, and some lenses have better coatings and geometry to reduce the chances of flaring.
That one looks a bit tricky to get rid of, but if you want, email the original to me, and I'll see what I can do this coming week.0
