CAAD Optimo - 90s retro-themed Ultegra Di2 winter training build project

ledeev
Posts: 208
Day 1 - Introduction
When I started cycling seriously back in 1993, MBUK magazine was always full of photos of exotic XTR-equipped Cannondales, all sporting some kind of wacky innovation (1.5in headset, cantilevered rear drop-outs, Headshok, -20deg stem, Delta V, etc.) which were a world away from my Altus C30-equipped Cro-Mo steel GT Talera. The thing I remember of those bikes was the paint jobs that the more expensive models were finished in. I’ve wanted a Cannondale ever since and spent the next 20 years watching them invent new things such as the Raven, the Lefty, the Scalpel and, less good in my opinion, the clever but creaky BB30. Nowadays I don’t have much time to go mountain biking so couldn’t justify a new mountain bike so instead a couple of years ago, bought a CAAD12 frame to build up. It’s got a few Cannondale quirks, like the random BB30a bottom bracket standard, 25.2mm seatpost and post-mount front caliper yet flat mount rear but apart from these the bike is superb in all aspects. I tried to give it a 90s flavour with purple anodised parts (link), but it looked wrong and I’ve since changed it to a more ninja black and very very dark grey style.
I still wanted a 90s-look Cannondale and despite already owning a winter and a summer bike wanted a niche ‘in-between’ fast road bike that I could use in damp conditions in the summer and drier conditions in the winter but that had a more aggressive position than my usual winter bike. The brief to myself therefore was retro-looking frame, hydraulic discs, Di2 and absolutely as cheap as possible - Kind of an old-look but with new tech / bits, a bit like what Chevy did with that yellow Camaro in the Transformers film.
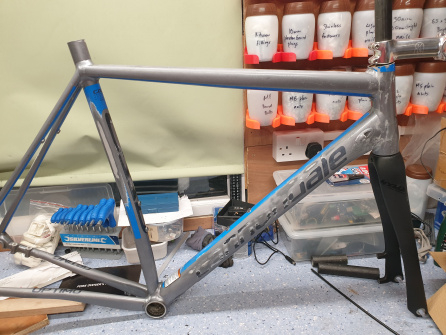
I started looking for bits in 2019 and eventually won this tired looking but otherwise okay 2016 58cm CAAD Optimo frame on eBay. To my amazement it came with decent 105 front and rear mechs, a knackered but sellable chainset, rear caliper and mismatched forks.

As I wanted Di2 and hydraulics, I sold all the components and the fork that came with the frame and netted myself a decent profit – result! With this profit I bought a new set of bearings and Hylix tapered road disc fork. I chose this fork as it was the only one I could find that had all-carbon construction, tapered steerer, post brake mount and eyelets for mudguards (even the one at the crown). Thus far the project had cost me nothing but time.
When I started cycling seriously back in 1993, MBUK magazine was always full of photos of exotic XTR-equipped Cannondales, all sporting some kind of wacky innovation (1.5in headset, cantilevered rear drop-outs, Headshok, -20deg stem, Delta V, etc.) which were a world away from my Altus C30-equipped Cro-Mo steel GT Talera. The thing I remember of those bikes was the paint jobs that the more expensive models were finished in. I’ve wanted a Cannondale ever since and spent the next 20 years watching them invent new things such as the Raven, the Lefty, the Scalpel and, less good in my opinion, the clever but creaky BB30. Nowadays I don’t have much time to go mountain biking so couldn’t justify a new mountain bike so instead a couple of years ago, bought a CAAD12 frame to build up. It’s got a few Cannondale quirks, like the random BB30a bottom bracket standard, 25.2mm seatpost and post-mount front caliper yet flat mount rear but apart from these the bike is superb in all aspects. I tried to give it a 90s flavour with purple anodised parts (link), but it looked wrong and I’ve since changed it to a more ninja black and very very dark grey style.
I still wanted a 90s-look Cannondale and despite already owning a winter and a summer bike wanted a niche ‘in-between’ fast road bike that I could use in damp conditions in the summer and drier conditions in the winter but that had a more aggressive position than my usual winter bike. The brief to myself therefore was retro-looking frame, hydraulic discs, Di2 and absolutely as cheap as possible - Kind of an old-look but with new tech / bits, a bit like what Chevy did with that yellow Camaro in the Transformers film.
I started looking for bits in 2019 and eventually won this tired looking but otherwise okay 2016 58cm CAAD Optimo frame on eBay. To my amazement it came with decent 105 front and rear mechs, a knackered but sellable chainset, rear caliper and mismatched forks.
As I wanted Di2 and hydraulics, I sold all the components and the fork that came with the frame and netted myself a decent profit – result! With this profit I bought a new set of bearings and Hylix tapered road disc fork. I chose this fork as it was the only one I could find that had all-carbon construction, tapered steerer, post brake mount and eyelets for mudguards (even the one at the crown). Thus far the project had cost me nothing but time.
2
Comments
-
Day 2 – Modifying the frame
The CAAD Optimo frame looks to be exactly the same as the current CAADX, which I was a bit surprised by as I always though road and CX bikes had slightly different height bottom brackets. Offering it up alongside my CAAD12, it looks to have the same geometry and even the same hydro-formed tubeset. Apart from the mudguard eyelets, I do wonder what the actual difference is between the O and the 12. Just stickers and marketing I suspect.
My first task was to hack off all the mechanical cable stops and enlarge the hole in the rear dropout to allow a Di2 cable to pass through. As there is so much metal here, I was confident that enlarging the hole from 3mm to 4mm wouldn’t weaken the frame too much.


 4
4 -
Day 3 – Preparing the frame
As the 90s Cannondales came either painted or polished, I had originally decided that I wanted to polish my frame to a high sheen. Whatever the paint was that Cannondale used on the Optimo, it is almost unbelievably tough and even wrapping it in dichloromethane-soaked towels wouldn’t lift it, so instead I sanded it with sand paper and started to polish it.

After several weeks of this, it became clear that in the areas between the chain and seat stays it was going to be impossible to get the frame to a mirror sheen.
Not only this, but I noticed that only after a few days, the mirror-sheen had started to dull. Being as this is a bike for all weathers, I gave up on the polished-look and decided to spray paint it. I’ve tried spraying frames before using automotive paint with limited success, so instead decided to try the Spray.Bike range of acrylic paints designed specifically for painting bike frames. After at least a year of deciding what colour to go for, I opted for ‘Royale’ oversprayed with Hibana Blue Keirin flake to try and recreate the look of the purple 1993 Cannondale M800 ‘Beast of the East’. I’ve dubbed this combo, in keeping with the 90s theme, the ‘Royale with flake’ 2
2 -
interesting........keep the thread updated please1
-
Day 4 – Priming the frame
After much deliberation, I decided that, to give it a proper 90s-look, I wanted a painted stem to match the rest of the frame. I acquired a 110mm Holdsworth stem from Planet X as I liked the simple paint-friendly forged design and the fact that it was already a raw aluminium finish that would be easy to spray, not to mention that it was only a tenner. I rubbed down the frame, forks and stem with wet and dry sandpaper to give a key for the primer, before giving all parts a thorough wash with soapy water, letting it dry then giving it all a wipe over with alcohol wipes.
With all parts ready for paint, I set up a ‘ghetto’ spray booth in my garden using an old plastic tarpaulin draped over my trellis and workbench. Before I started, I made sure that the frame and fork were supported so that they could be sprayed in their entirety.


The primer took to the frame, forks and stem very well and I was glad of the thorough preparation that I did on the frame beforehand.


One thing about the primer finish was that it highlighted all the areas that needed remedial attention, such as rogue debris from the polishing wheel stuck in the drive-side dropout, as shown here.
This was easily fixed with fine sandpaper and refinished with primer. After an hour, the primer was dry.
2 -
Day 5 - Base-coating the frame, fork and stem
The next task was to basecoat the frame, fork and stem. With an element of paranoia around messing it up, I read and re-read the Spray.Bike instructions, which stated that the can should be held approximately 2-3 inches from the frame. This seemed close to me, but sure enough, it worked and by keeping the can moving, the coverage was full and consistent. After leaving it to dry for an hour, I gave the paint a polish to harden it, then a further 6 hours later put on a second coat.

 3
3 -
Day 6 - Flake overcoat
To give the finish some depth, my next task was to give the frame an overcoat of Keirin flake. After consulting the instructions it turned out that unlike the basecoat, the flake had to be sprayed at a distance of 12 inches. I found the flake to be much more difficult to use than the base. As I was learning as I went along I messed up some areas, with overspray and drips, which needed attention with sandpaper and refinishing.
Finally, I mastered the technique of smoothly moving the spray over the frame without stopping to give a consistent finish. Again, I let this dry for two hours and polished it to harden it.


 4
4 -
Day 7 – Fitting the decals
With the frame, forks and stem base-coated and flaked, the next task was to fit the all-important decals. I bought these from a sticker shop on eBay and were replacements for the M400 mountain bike. These were the closest I could find to the retro-look that I was after.
The head-tube and seat tube decals were easy to fit and I just did these by eye. I particularly liked the seat-tube sticker - this frame is made in Taiwan by cyborgs and not by hand nor in the USA. I thought that chucking the M400 sticker away seemed a shame so I cut the ‘M’ off and put the 400 on instead. Just to mark how many days I spent deciding on the colour.

The fitting of the down-tube decals was much more involved, not helped by the shape of the hydro-formed tube. I offered the decal up whilst still on its backing and aligned it, then by using masking tape to mark it, pulled the backing off the sticker and applied it.

I repeated this on the other side, again using the masking tape. This didn’t quite go to plan and there were some wrinkles in the stickers. By using a scalpel I was able to lift the sticker and reattach it correctly. Phew! YouTube helps here – worth a look.
In order to give the decals and the frame further protection, I over-sprayed the frame and forks with clear coat. Unlike the flake, this needed to be sprayed at a distance of 8 inches, but like the flake was just as easy to mess up. Thankfully I only did this in one area that was easy to rectify.
After retouching it, and letting it dry, the frame is now finished, ready to be built up. I’m delighted with the finish that I’ve achieved and it’s not a million miles from the look that I was aiming for.
 8
8 -
Well done. I do enjoy reading these threads.1
-
-
Day 8 – Anodised purple bits
As its a 90s theme, there needs to be an element of purple-anodising in the build. I’ve tried my best here but purple bits are much less plentiful than they used to be.
Back in the day the likes of U.S.E., Ringlé, X-Lite, Onza, Nukeproof, Answer, Hope Technology and about a hundred others offered pretty much all components in purple, even rear mechs and brake cantis. Like those Cannondale frames, back then I really really loved Ringlé componets as they were so different with their industrial look. The Zooka stem, Moby post and set of the uber-cool drilled out QR skewers and seatclamp were on my list but just couldn’t afford them back then.
I stumbled accross a firm that makes reproductions of the mythical Ringlé H2O bottle cage so was pleased when these arrived from the United States. Be interesting to see how these perform - if I remember from the MBUK articles, they weren’t impressed with them as they had a tendency to launch bottles over bumps. A slight worry as there are a considerable number on the roads near my house.
3 -
Day 9 – The wiring harness
As this bike will have Di2, the first build job is to fit the rear brake hose and the internal wiring harness. Although the frame was never designed for this (though seemingly neither was the CAAD12 without attention from a 5mm drill), the internal holes are sufficiently large to allow the wires to pass through. This requires a bit of patience but gives a massive amount of satisfaction when completed.
I had intended to an external battery because I’ve already got a battery mount and battery as well as one of the original junction As in my spares box. However, I in the end chose to use an internal battery as I wanted to upgrade one of my other bikes so was left with a spare. As it's going in the seatpost I wrapped some packing foam and insulation tape around it to keep it secure.
Fortunately I had a 5-port junction A that I must have bought by mistake in a sale which meant that I was now able to charge the battery as well. I mounted it on a steerer mounted adaptor, partly because I didn't want the rubber thing that Shimano supply to spoil the look, but because I'd lost the mount that Shimano supply.
5 -
Day 10
Next was to fit the headset, fork and stem. Here is where I re-encountered Cannondale’s trademark weirdness as unlike the rest of the world that uses a 1.125in upper and 1.5in lower, the Optimo uses a 1.125in upper and 1.25in lower, so the really nice fork that I’d bought and painted wouldn’t fit. My fault as I should have checked it, but annoying anyway. It turns out that nobody makes a 1.125in / 1.25in tapered road fork anymore, let alone one with disc brake mounts and mudguard eyelets. In the end I gave up and bought an unbranded carbon fork, with an alloy crown and a straight carbon steerer tube. I had to buy an MR137 bearing too and an adaptor lower race from Madison Components that in effect turns a 1.125in fork steerer into a tapered 1.25in.
I trial fitted it and sprayed the fork and it all went together well. I had planned to use a cone spacer to raise the bars, but didn’t like the look, so in the end fitted a 20mm spacer from Hope to get the right height and painted the top-cap to match the rest of the frame. I like the height of the bars on my CAAD12 so measured it and set the stem at the same exact height relative to the front hub.
With this in place, I fitted the bars. I chose Deda Zero RHM bars (The new name for the Deda RHM01) because, unlike a lot of bars they fit my hands well and have a shallow enough drop to be useable in all conditions. They’re also cheap and being aluminium won’t shatter if I land the bike on its bars during a crash. I fitted the Di2 STI units as well. Here I chose the R785 units because they’re hydraulic, Di2 and again they’re cheap and easy to come by on eBay. Whilst I much prefer the sleek look of the R8070 units rather than the R785 ones with their pronounced ‘forehead’ design I just couldn’t justify the cost. The R785 units don’t have the multi-function button in the tops of the hood either, which is a bit of a shame, but the old battery I’m using isn’t compatible anyway.
1 -
How do the hydro hoods work with the rim brakes?0
-
shirley_basso said:
How do the hydro hoods work with the rim brakes?
They're fitting disc brakes...Ben
Bikes: Donhou DSS4 Custom | Condor Italia RC | Gios Megalite | Dolan Preffisio | Giant Bowery '76
Instagram: https://www.instagram.com/ben_h_ppcc/
Flickr: https://www.flickr.com/photos/143173475@N05/0 -
Yep - just re-read. Oops2
-
Day 11 - Chainset
This morning I fitted the bottom bracket and crank set. On a BB30 bike this is easy and doesn’t require any specialist tools, unless you can’t manage to get the big circlip in that is. The crankset that I’m using for this build is a BB30 172.5mm 130BCD Quarq D-zero that is a refugee from my Felt TT bike that I sold last year. I had originally planned to fit a more in-keeping Shimano 7700 Dura Ace 53/39 that I managed to get cheap to keep the costs down but I don’t want to be without a power meter.
As the rings that were on the Quarq went on to my new TT bike, I needed new ones. As this is a bike to be ridden in the cold in full kit, to make it slightly easier I opted for 52/38 rings from TA with bolts from Race Face (found cheap in CRC bargains).
1 -
Day 12 - Disc brake calipers
Today I fitted the brake calipers. These are Hope RX4SHs, post mount front, flat mount rear. I’m using a Hope K mount at the front to allow me to use 160mm rotors. The SH bit denotes that these calipers are compatible with the mineral brake fluid that Shimano use, rather than the DOT5.1 stuff that everyone else uses. Like the cranks, these calipers aren’t brand new but are off another bike, my CAAD12 in this case, hence the post front / flat rear Cannondale oddity. After two years of all-weather use, they cleaned up like new. As always, bleeding is a faff, but at least it’s a lot easier with the R785s than with the R8070 units.

1 -
Day 13 - Saddle and seatpost
Today I fitted the saddle and seatpost. The seat-collar here is new (Nukeproof 31.6mm) but the post (U.S.E. Sumo) and saddle (Fizik Arione R5) are from other bikes. Nukeproof were making components back in the 90s although not on the scale that they are now. Their coolest product in my opinion was a front hub made from aluminium with a central sleeve made of bullet-proof lexan that meant that if you set it right in the dropout the logo on the axle stayed still whilst the wheel rotated. Trick stuff. U.S.E. posts were commonplace back in the day too, and they were a 25mm (or something equally as piddly) diameter meaning that you could swap them between bikes by just swapping the shim. Clever. They did have a habit of loosening during rides though, so you had to keep your eye on the bolt torque. Not that I ever did of course and I, literally, have the scars to prove it. If you ride in the Quantock hills look out for a red-anodised USE seat post cradle assembly, it’s up there somewhere.
1 -
It looks lovely but how are you pacing yourself to this extent? I’d be keen to get it finished!1
-
Day 14 - Wheels
Like a lot of the other bits on this project, the wheels were old ones that I had already built up. The rims are de-stickered 28h Pacenti SL25s built on to Shimano CX75 hubs with Sapim Laser spokes. I picked up the rims years ago, again on the cheap, and spent a long time trying to find 28h hubs that had a centre-lock brake mount. Shimano CX75s fitted the bill here and have a kind of grey retro-XTR look about to them. Rotors are floating Shimano SLX 160mm units. The QR skewers are modern steel Hope ones, purple anodised of course.
I’m a convert to road tubeless and these wheels are set up to run 25mm Continetal GP5000 TL tyres. In my experience these are probably one of the best tyres there is at the moment, given that you can train in the winter on them AND race TTs on them. These wheels have been sat in a bag for about 9 months and the tyres were completely flat. I tried to reinflate them, but no dice. I filled them with new sealant but still they wouldn’t hold air. It turned out that as the tyres had deflated the tyre bead had dragged the tape across the rim, meaning that it wouldn’t hold pressure. I peeled off the old tape and renewed it with 25mm Tesa tape, wrapped round twice, with overlaps at the valve hole. The front one sealed fine, but the rear took a lot of faffing about with to seal. After much cursing, it holds air now.
 1
1 -
Day 15 - Derailleurs and chain
With the big bits done, it was time to fit the mechs and the battery. A couple of years ago I saw a heap of Dura Ace 9070 FDs going cheap on CRC, so bought all of them and have been gradually updating my bikes from Ultegra to Dura Ace. The FD that I’m using here is a 6800 11 speed that’s a swap out from another bike. The RD is a brand new Ultegra R8050 one. I wanted a GS cage to give me the option of running a 34T sprocket, should I need to. Before I fitted them, I zapped both mechs and the battery with the latest firmware via my PCI-E interface.
Chain is a SRAM PC1150 because I like SRAM chains. I always use them due to them having a quick link.
1 -
Day 16 – Wrapping bar tape
As the messy bits are out of the way one of the last things to do is wrap the tape and generally tidy up the frame. I use Fizik classic tape on all my bikes as I like how long it lasts, the thickness and feel of it and the fact that its easy to clean. I also fitted the purple Rockstar Components Garmin mount.


 1
1 -
-
Day 17 - Basic bike complete
With all the components fitted, the bike is complete. There are still the mudguards and lights to fit, but here it is:

Looks exactly how I imagined it right at the start. Not exactly light in weight though, especially at the back end.7 -
Save a bit of weight by cutting the excess seat post down when you have set your height
") Insta: ATEnduranceCoaching
Insta: ATEnduranceCoaching
ABCC Cycling Coach0 -
The bike looks beautiful but please do something with the front brake hose - it would drive me crazy it flapping about like that!0
-
Looks brilliant but don’t rush it. I reckon you can stretch the mudguard fitting over a week and a day each for front and rear lights. (But the bike does look lovely 😉)ledeev said:Day 17 - Basic bike complete
With all the components fitted, the bike is complete. There are still the mudguards and lights to fit, but here it is:
Looks exactly how I imagined it right at the start. Not exactly light in weight though, especially at the back end.0 -
Day 18 - Rear mudguard
My choice of mudguard for the past 15 years has been the tried and tested SKS Thermoplastic and I planned to fit these to the Cannondale. Normally this is a fiddly and time-consuming but straight-forward operation. Not so with the Optimo. Although it has conventional mudguard eyelets on the dropout, Cannondale choose, (unlike the rest of the world) to put the front mount bolt hole just below the front mech band clamp rather than on the chainstay bridge. This is annoying as it meant drilling a hole in the mudguard and using spacers to get it to fit correctly. I used a countersunk M5x20mm titanium bolt to attach the guard in this location as it's very much in the firing line of all the detritus and I don't like having to cut these out when they corrode into place and snap.
The Optimo has long since lost its seat-stay mudguard mount, so in keeping with the theme of doing this right rather than quickly, I set about designing and installing a 3d-printed replacement that integrated the mount for the SKS in one piece. Usually this takes a few iterations, but miraculously I got this one right first time.
Obviously, the mudguard mount was fitted using purple anodised bolts.
4 -
Amazing work! Do you have any shots of the bike as a whole with the guards fitted?0
-
why have you ruined it with mudguards?
it was alright until you stuck those on..The camera down the willy isn't anything like as bad as it sounds.
0
