Cervelo P3C (Internal Di2 conversion)
ledeev
Posts: 208
I've had my P3 for 6 years and the gears were starting to wear out and jump, so I took the opportunity to upgrade it to a super clean internal Di2 setup as I've been so impressed with the system on my commuting bike.
I spent many hours planning the conversion, and found nothing on the internet that I really liked as most seemed to run the wires on the outside somewhere, or had an external battery which just looks horrible on a TT bike, or did an unacceptable amount of drilling. As such, I'd thought I'd share what I did for the benefits of others contemplating this modification.
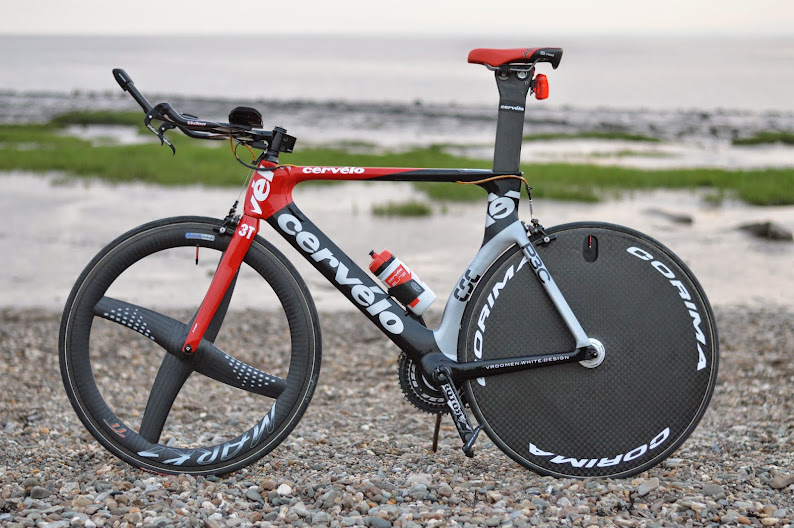
Frame: Cervelo P3C (2008, size 58)
Fork: 3T Funda
Bars: Vision aero (290mm extension, 90mm stem)
Stem: as above
Headset: Cane Creek
Bar Tape: None
Front Brake Lever: Vision 'Crab-claw'
Front Caliper: Campagnolo TT
Rear Brake Lever: Vision 'Crab-claw'
Rear Caliper: Campagnolo TT
Shifters: Shimano Di2 bar end
Cables: Shimano Di2
Front Mech: Shimano Ultegra Di2
Rear Mech: Shimano Ultegra Di2
Seat: Adamo race (steel)
Seat Post: Cervelo P3C
Seat Post Clamp: Cervelo P3C integrated
Cranks: Rotor 3D
Chainring(s): FSA aero (54 / 42T)
Chain: SRAM 10s
Cassette: Dura Ace 11-21
Pedals: Look Keo Classic
Bottom Bracket: Ultegra 6700
Front Wheel:
Rim: Xentis Mark 1 TT
Spokes: Xentis Mark 1 TT
Hub: Xentis Mark 1 TT
Tire: Vittoria Corsa Evo
Back Wheel:
Rim: Corima disc (with after market decals, I really hated the stock decals!)
Spokes: Corima disc
Hub: Corima disc
Tire: Vittoria Corsa Evo
Weight: 19lbs
I wanted a full internal installation, with minimal drilling and in the end only ended up having to enlarge the LH downtube cable stop and the hole that the front mech cable passes through. I assembled the wiring harness using 800mm wires for the mechs and batteries and 1400mm wires for the link to the front junction and the battery, then taped the ends to a length of brake cable and threaded it through the seat tube down through the hole in the BB shell. I then passed the cables inside the chainstay to the rear mech and up to the front mech, and out through and then back into the frame for the cable to the front junction through the enlarged hole in the frame. This operation required a lot of patience. The battery for the Di2 is fitted in the seatpost and secured with a bit of Celotex insulation foam that I cut to shape. I covered over the wires with sign makers plastic (colour coded as best I could to match) to clean up the aerodynamics.
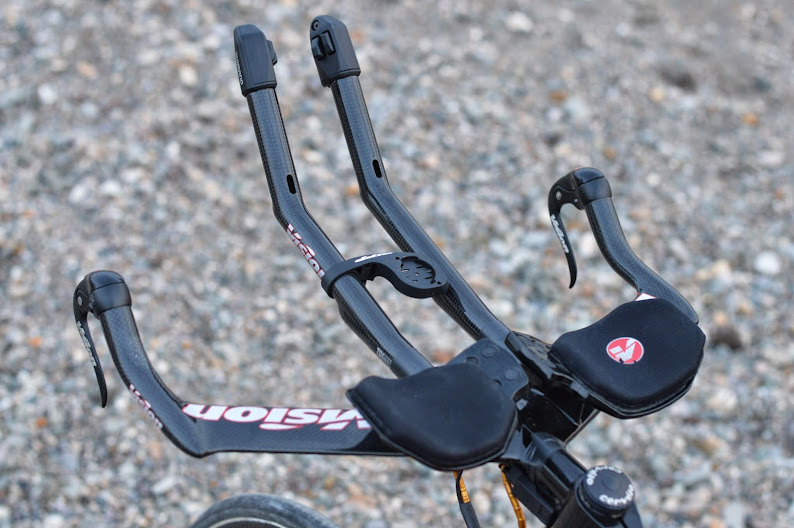
Di2 shifters fitted to bar extensions, cables run internally
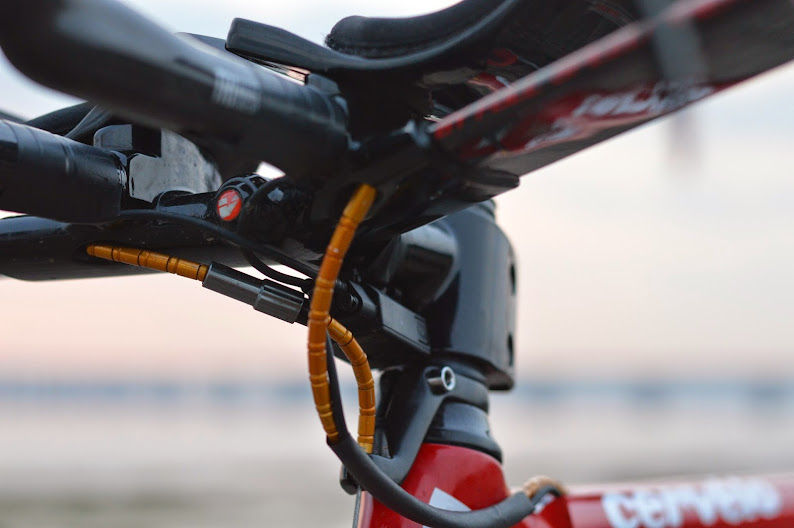
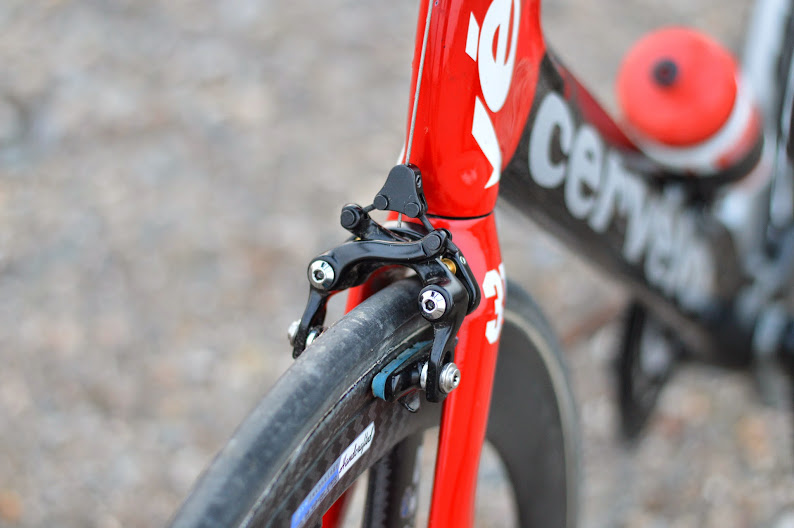
Di2 junction box taped under the stem, control cable runs in heatshrink alongside brake cable. Brake adjusters to allow for different width rims.

Unused cable stop taped over
Di2 wire going out then back into to the frame
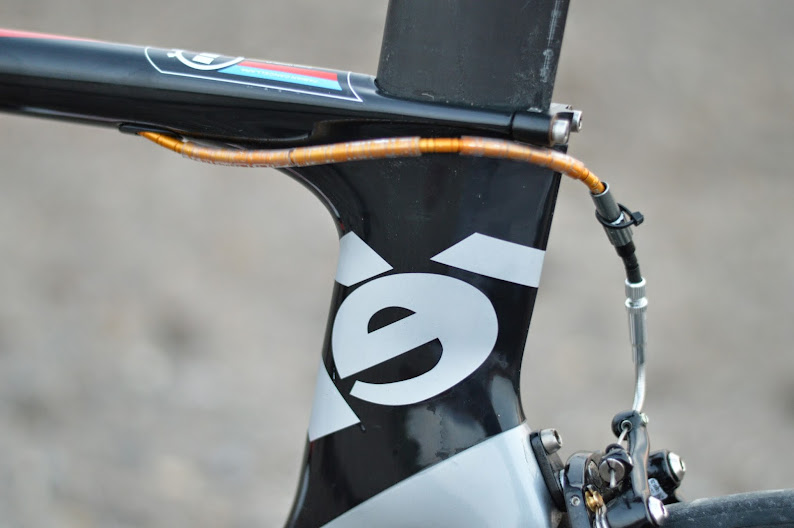
Rear brake crosses over to standard entry hole try and keep the wire out of the way (can't remember what the rogue cable tie is for)

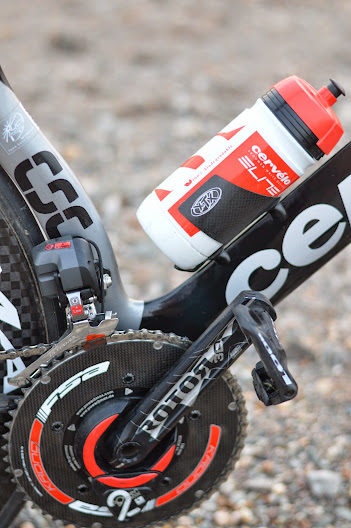
Rear mech wire passes out of the hole in the rear of the frame, but is secured with a cable tie to stop it getting sheared by the chain
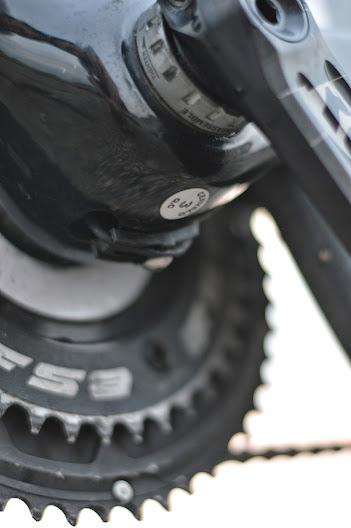
Front mech wire passes through enlarged hole into BB shell.
I spent many hours planning the conversion, and found nothing on the internet that I really liked as most seemed to run the wires on the outside somewhere, or had an external battery which just looks horrible on a TT bike, or did an unacceptable amount of drilling. As such, I'd thought I'd share what I did for the benefits of others contemplating this modification.
Frame: Cervelo P3C (2008, size 58)
Fork: 3T Funda
Bars: Vision aero (290mm extension, 90mm stem)
Stem: as above
Headset: Cane Creek
Bar Tape: None
Front Brake Lever: Vision 'Crab-claw'
Front Caliper: Campagnolo TT
Rear Brake Lever: Vision 'Crab-claw'
Rear Caliper: Campagnolo TT
Shifters: Shimano Di2 bar end
Cables: Shimano Di2
Front Mech: Shimano Ultegra Di2
Rear Mech: Shimano Ultegra Di2
Seat: Adamo race (steel)
Seat Post: Cervelo P3C
Seat Post Clamp: Cervelo P3C integrated
Cranks: Rotor 3D
Chainring(s): FSA aero (54 / 42T)
Chain: SRAM 10s
Cassette: Dura Ace 11-21
Pedals: Look Keo Classic
Bottom Bracket: Ultegra 6700
Front Wheel:
Rim: Xentis Mark 1 TT
Spokes: Xentis Mark 1 TT
Hub: Xentis Mark 1 TT
Tire: Vittoria Corsa Evo
Back Wheel:
Rim: Corima disc (with after market decals, I really hated the stock decals!)
Spokes: Corima disc
Hub: Corima disc
Tire: Vittoria Corsa Evo
Weight: 19lbs
I wanted a full internal installation, with minimal drilling and in the end only ended up having to enlarge the LH downtube cable stop and the hole that the front mech cable passes through. I assembled the wiring harness using 800mm wires for the mechs and batteries and 1400mm wires for the link to the front junction and the battery, then taped the ends to a length of brake cable and threaded it through the seat tube down through the hole in the BB shell. I then passed the cables inside the chainstay to the rear mech and up to the front mech, and out through and then back into the frame for the cable to the front junction through the enlarged hole in the frame. This operation required a lot of patience. The battery for the Di2 is fitted in the seatpost and secured with a bit of Celotex insulation foam that I cut to shape. I covered over the wires with sign makers plastic (colour coded as best I could to match) to clean up the aerodynamics.
Di2 shifters fitted to bar extensions, cables run internally
Di2 junction box taped under the stem, control cable runs in heatshrink alongside brake cable. Brake adjusters to allow for different width rims.
Unused cable stop taped over
Di2 wire going out then back into to the frame
Rear brake crosses over to standard entry hole try and keep the wire out of the way (can't remember what the rogue cable tie is for)
Rear mech wire passes out of the hole in the rear of the frame, but is secured with a cable tie to stop it getting sheared by the chain
Front mech wire passes through enlarged hole into BB shell.
0
Comments
-
oh my...
 0
0 -
Very tidy. How do you find the saddle on long rides?argon 18 e116 2013 Vision Metron 80
Bianchi Oltre XR Sram Red E-tap, Fulcrum racing speed xlr
De Rosa SK pininfarina disc
S Works Tarmac e-tap 2017
Rose pro sl disc0 -
I don't do anything other than 10 and 25 mile TTs on this bike, so can't really answer your question.
I used to have an SLR XP, but that caused serious numbness when in the aero position. I swapped to the Adamo and the numbness went away to be replaced with chaffing on the inner thigh (chamois cream helps with this). Other than that it's really good for short TTs but I reckon a narrower nosed model would be better for longer rides.0 -
Love it!!Cipollini Bond
Pinarello GAN0 -
Deadly! Love the 4 spoke wheels!
Maybe these over the holes on extensions?
http://www.wiggle.co.uk/lizard-skins-carbon-leather-patches/0 -
Or maybe some of that sticky backed carbon effect tape that the boy racers use on their Corsas. I'm toying with the idea of using thin white tape like this:
I've always thought that gave a really professional look on these particular bars.
I've also been mulling over how to make a 'Between The Bars' battle cage mount like the P5 comes with - rumour has it that this setup may even reduce drag! 0
0 -
Only the Irish will know Deadly is a complimentIrishMac wrote:Deadly! Love the 4 spoke wheels!
Maybe these over the holes on extensions?
http://www.wiggle.co.uk/lizard-skins-carbon-leather-patches/ 0
0 -
-
Hi Ledeev,
I realise this is an older thread, but I am planning a very similar conversion and saw your bike while trying to figure out how to do it ...
How did you route the e-wire from the front junction? Did you route it through the top tube or bend it back and go down the down tube? If you are using the top tube, is there sufficient space routing the cable down parallel to the seatpost?
How big a hole did you need to drill to get both the brake cable as well as the e-wire through the cable stop on the top tube? Did you pull the e-wire first and then the brake cables?
You say you had to "enlarge the LH downtube cable stop" - did you mean the top tube brake cable stop? From your pics it looks like you don't use any of the downtube holes.
many thanks,
the Hoff0 -
Good evening Hoff,
My photos don't quite capture the crucial bit of the installation, but look closely at the top one and read on and I've hopefully answered your questions...Hoffmeister wrote:How did you route the e-wire from the front junction? Did you route it through the top tube or bend it back and go down the down tube? If you are using the top tube, is there sufficient space routing the cable down parallel to the seatpost?
The e-wire runs down the down tube and enters on the hole that was previously used by the front mech cable. I assembled the whole Di2 harness then threaded it in down the seat tube.
I attached (using insulation tape) the long wires to a length of brake outer then threaded them down the seat tube and outer of the hole in the frame.
From there I threaded the front mech wire up through the (enlarged) front mech hole and the rear mech wire inside the chain stay.
I then fed the wire up to the junction back in through the frame and out through the enlarged front mech cable stop hole. To stop the wire moving about I pushed it into the old cable guide. You can see this in one of the photos.
I've heard that you can fish the wires through using string and a vacuum where you want it to come out.Hoffmeister wrote:How big a hole did you need to drill to get both the brake cable as well as the e-wire through the cable stop on the top tube? Did you pull the e-wire first and then the brake cables?
You don't need to enlarge the brake hole. I used a 4.5mm drill and turned it carefully to enlarge the downtube hole. You can check to see whether the hole is large enough by feeding the Di2 plug into it.Hoffmeister wrote:You say you had to "enlarge the LH downtube cable stop" - did you mean the top tube brake cable stop? From your pics it looks like you don't use any of the downtube holes.
No, I did use the LH downtube hole. The e-wire runs along side the brake wire in some heat shrink then where the brake cale enters the frame, the e-wire snakes its way down to the LH cable stop and is hidden under sign makers tape (red and black). The wire looks like a blister on the side of the frame.
Hope that helps, get in touch if you need more help.
Deev0 -
Ah yes ... now I can see it. Time to get an eye test.
Great job, I like the way you hid the cable down the down tube, much neater than a zip tie.
Is the hole down the seat tube reasonably big or is it a tight fit to get the wires down into the bottom bracket and the front derailleur hole?0 -
The cavity inside the frame is huge as the frame material is quite thin, especially around the seat tube and BB. The bottom bracket 'shell' isn't actually a shell on the P3C and it's possible to route the wires round it without removing the bearings. In fact, there are no holes in the bottom bracket at all, apart from at the ends of course.0
-
Fantastic - thanks for your help0
-
No probs. Please let me know how you get on. I'm going to convert my Soloist in the next few weeks so will try and post a few more photos of the process.0
-
t's been a while since I posted an update, so here's an update.
The total absence of sensible adjustment on the tri-bars is getting a bit annoying. I've been pondering running the extensions higher at the front, longer and closer together, but can't because they're fixed. As such, I'm pondering some new bars.
After browsing the blog of a local TTer who's come from nowhere to being world class in about a year, I saw this:
Looks epic in my opinion and, also, it looks like things have move on a long way since the P3.
The 3T Brezza II bars looks like they have almost everything I need, and allow more some adjustment and fitment of aftermarket extensions (like the ones in the photo above, anyone know what they are?).
Another cripplingly expensive option that I've found is the TriRig Alpha X. Looks like a truly incredible option in terms of aero and adjustement, price, etc. They could throw a pair of Omega calipers in the box too while they're at it. Hmmmm. 0
0 -
First, big thanks for putting this out there. Like Hoff, I've been trying to find some good examples of doing this. I'm doing it on a P2 so maybe slightly different, but hopefully a similar flavor. A couple questions.Ledeev wrote:I assembled the wiring harness.... then taped the ends to a length of brake cable and threaded it through the seat tube down through the hole in the BB shell.
When you say you threaded the harness down the seat tube out through the hole in the BB shell, you mean hole to the rear of the cable guide?Ledeev wrote:I then passed the cables inside the chainstay to the rear mech
There is a stock hole in the chainstay to pass the RD e-wire through? Something I never even looked at given the cable guides that were mounted to the chainstay, and of course my bike is at home right now and can't look!
Is that a three port or 5 port junction? You only had one cable going to the downtube hole, so I'm assuming that you had a pair of junction B-boxes in the seat tube tying the battery/FD/RD together, or you soldered all the wires together in the seat tube area.
Thanks in advance!
Andrew0 -
When you say you threaded the harness down the seat tube out through the hole in the BB shell, you mean hole to the rear of the cable guide?
Yes. Assemble the whole wiring harness (junction A, RD cable, FD cable and the one that goes to the B junction down through the seat post. If the P2 is like the P3 it'll, with a bit of fiddling, come out the hole where the FD cable enters the frame. Careful not to drop the battery wire, the battery needs to go in the seat post.There is a stock hole in the chainstay to pass the RD e-wire through? Something I never even looked at given the cable guides that were mounted to the chainstay, and of course my bike is at home right now and can't look!
Yep. There is a hole, at least there is on my P3. Not sure whether Cervelo intentionally future proofed it, but you can use it for the e-wire.Is that a three port or 5 port junction? You only had one cable going to the downtube hole, so I'm assuming that you had a pair of junction B-boxes in the seat tube tying the battery/FD/RD together, or you soldered all the wires together in the seat tube area.
It's a 5 port to allow me to fit brake lever shifter units at a later date. The B junction is on the bars, the A junction is inside the frame somewhere. No soldering. Standard Di2 stuff.
Don't forget to put the tie wrap things on the wires to stop them rattling.
Good luck!0

