Octalink BB Removal
On my secondhand Wilier the BB feels like its full of gunk... it spins but grinds to a halt after a couple of rotations.
I'm trying to take the BB out to see if it needs replacing or can be saved but it seems to be stuck.
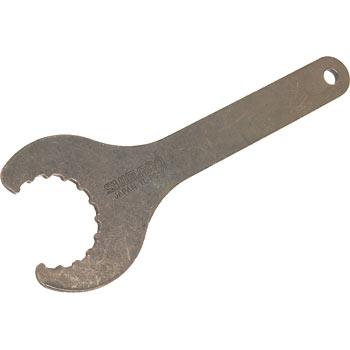
I'm using a tool like this
on the left hand side of the bike, turning anti-clockwise, although I tried turning clockwise as well, but no joy.
It seems to be digging into the metal of the BB, and damaging it so I've given up for now.
What would be the proper tool for this job? Am I turning in the right direction? Is it best to take it straight to the LBS?
Many thanks for your help
I'm trying to take the BB out to see if it needs replacing or can be saved but it seems to be stuck.
I'm using a tool like this

on the left hand side of the bike, turning anti-clockwise, although I tried turning clockwise as well, but no joy.
It seems to be digging into the metal of the BB, and damaging it so I've given up for now.
What would be the proper tool for this job? Am I turning in the right direction? Is it best to take it straight to the LBS?
Many thanks for your help
'07 Specialized Tricross Sport
Wilier Alpe D'Huez
Wilier Alpe D'Huez
0
Comments
-
Firstly, you might want to check BB threading on Wilier frames - Italian brand but made in Taiwan - the cups should have a marking - if it says 36mm x 24 TPI then they're Italian threaded and have RH threads on both sides. BS / English threads are 1.37" x 24 TPI and are LH thread on left side i.e. unscrew clockwise. It's not usual to put threadlock on Italian cups too to stop them unscrewing - may be worth giving your BB tool a sharp tap with a mallet to 'crack' the thread. Obviously, your LBS should know which way they go and will probably use a socket-type tool with a longer leverMake mine an Italian, with Campagnolo on the side..0
-
Monty. I think you will find the non drive side is a RH thread on an English BB. The drive side is LH. This is why it does not come loose unlike the Italian ones.
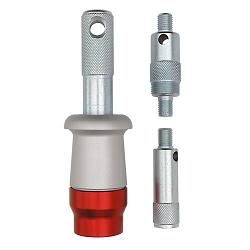
Slow Liam. This is the type of tool needed for an Octolink BB. The one you show is for HT2 outboard bearings.
http://www.chainreactioncycles.com/Models.aspx?ModelID=17704
There are cheaper ones. This is just the first one I found.0 -
When I was faced with this problem I bought one of these and didn't regret it:

http://www.probikekit.com/display.php?code=T4415
I had to buy a decent 32mm / 34mm spanner to go with it, but even using this the bottom bracket felt completely stuck. However, when I attached an extension bar the extra leverage meant it came loose no problem.
Edindevon0 -
Another bit of advice is to lie your bike on it's side supporting the frame at strategic points with large bits of wood or blocks with card or towels between to protect your bike frame. Give the BB a good clean. As has been suggested you could give it a good hard sharp tap with mallet, but I would only do this if it doesn't want to shift first time when you try to turn it, the right way of course. Take care though you don't want to do any other damage to your frame. Put the Octalink removal tool into the BB so it sits squarely and won't slip or chew the teeth of the BB. Ideally you need a f**k off socket and long extension bar on the removal tool and place your weight squarely over the end as you try to turn it slowly so it doesn't slip. If you've only got a short one then a piece of scaffolding pole over it to extend it is good .......... Be methodical and patient and it should loosen no probs. Don't take one cup out totally just loosen it then loosen the other as the non drive cup locates the axle as the drive side cup is part of the whole BB cartridge housing and does not separate from the cartridge, unlike the non drive side, which makes sense if you think about it.
Once the BB is out inspect and thoroughly clean the threads inside the frame with a clean lint free cloth, an old cotton T shirt is good. Then put some grease ideally Copperslip, bearing Teflon grease or if none of that bog standard LM grease on the clean threads. Before you screw the new BB cup in proper just screw the new non drive cup part of the way in and out of the frame to make sure it is not cross threading. Wipe again if necessary and re-apply fresh grease. Put the non drive side cup almost all the way in or right the way in and then unscrew a couple of full turns. This is because the non drive cup acts as a guide for the axle as you screw the BB cartridge in from t'other side, the drive/chainset side. Then do same for the whole cartridge from the drive side. Screw the drive side in fully tightening to specified torque then the tighten the non drive side cup fully taking up any play that remains. Use a torque wrench if you have one to tighten to the specified torques. If not, no worries just tighten the cartridge and cup firmly but don't go mad over tightening them as one day you might have to get them out again.......... hey presto job done. All you have to do is refit the chainset, non drive side crank, tighten crank bolts (important), refit pedals, chain and you are done. Wash hands or remove gloves. Go for test ride. Simples.
Good luck.Life is like a roll of toilet paper; long and useful, but always ends at the wrong moment. Anon.
Think how stupid the average person is.......
half of them are even more stupid than you first thought.0 -
Edindevon wrote:When I was faced with this problem I bought one of these and didn't regret it:

http://www.probikekit.com/display.php?code=T4415
I had to buy a decent 32mm / 34mm spanner to go with it, but even using this the bottom bracket felt completely stuck. However, when I attached an extension bar the extra leverage meant it came loose no problem.
Edindevon
Yep something like this. I think Halfords do something similar but not quite so manly for about £5.99.Life is like a roll of toilet paper; long and useful, but always ends at the wrong moment. Anon.
Think how stupid the average person is.......
half of them are even more stupid than you first thought.0 -
F***-it - go to www.parktool.com
To the OP, your question is for Octalink and image is for a Hollowtech II tool?Make mine an Italian, with Campagnolo on the side..0 -
First spry TF2 Oil or similar on to the bottom bracket threads. Try removing the drive side first and then spray oil from the inside to the thread on the non drive side.
I use this tool. It locks the Cartridge Tool to the bottom bracket axel to avoid the tool slipping, damage and injury
See Link > http://www.weldtite.co.uk/productdetail/364/pages/removers-advanced-user/retainer-tool-adaptors.aspxMobile Bicycle Mechanics Specialist http://www.cycletechuk.co.uk0 -
Thanks for the advice guys. Finally got it out, with a combination of the right tool, a huge wrench and a bigger mallet.
Sorry for not thanking you earlier. All the advice was useful!'07 Specialized Tricross Sport
Wilier Alpe D'Huez0

